
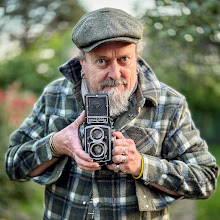
A spanking gleaming brand new Bachmann BR Std. 3MT with an ex GWR B set slows for Catcott Burtle.

About Me
- Chris Nevard Model Railways & Photography
- Professional Photographer, Model Maker, Writer & Pretend Musician
31 December 2009
27 December 2009
Bachmann BR Std. Class 3MT - a layman's review.....
I like many have really been looking forward to this release of what is a very useful and attractive workmanlike engine.

In ready to run form, the nearest prototype we’ve had to this is probably the Bachmann Ivatt Class 2 tank which despite being a good model in its day is now getting a little long in the tooth.
Enter the Bachmann BR Std. 3MT 2-6-2; the first thing I noticed was the new style of smart packaging which allows one to see the actual model without having to open the box. The way this has been done is very innovative, though I must admit that it took me a couple of minutes to work out how to get in - the clear sleeve confusing me!
First impression is the super fine paint job, the green having a wonderful freshly polished look about it with very finely executed lining in finest Swindon style. Examining the locomotive in greater detail I thought that maybe I had some grease from my dinner on my hands, but no, the chassis is very heavily lubricated with some kind of light machine oil with appears to get everywhere. I guess this is to ensure the fine valve gear and other moving parts have minimal friction – maybe a tad overdone with this particular example. The locomotive is very finely detailed, and if you’re comparing it to the old Ivatt Class 2 tank, this is a totally different beast – it looks absolutely stunning with the level of delicate detail and finish possibly setting it above what could be achieved with even the finest crafted kit.
As for strict millimetre accuracy I won’t comment because I’m not a ‘loco-ist’, but to me it captures the feel of the real thing perfectly, with the ¾ rear view being particularly attractive.
After adding the detail pack (which I have to say was a doddle even after a couple of pints of ale) it was time to run the loco in. Most will test the running before adding the detail pack just in case it's duff and needs to be returned, I rarely use common sense when it comes to model railways!
Last night my circle of track was laid (3rd radius set-track is about as tight as one can go with the front steps added) and the pretty little locomotive was given a good running-in to get everything to bed in nicely. After about an hour of silky smooth gliding around the circle of track in both directions, it suddenly ground to a halt. I thought at first the cat had swiped the locomotive, but no, the eccentric crank on one side had somehow or other come adrift and could be seen swinging from the expansion link even though the retaining screw was still in situ.After bit of muttering and the use of a small screwdriver, I managed a successful reassembly (with a dash of cyano for good measure which will no doubt void the guarantee) and all is now well. In time it will be interesting to read whether anyone else suffers this problem.
Eccentric crank aside, which is down to poor assembly; you may have read recently in the modelling press about that maybe RTR is becoming too delicate? Until now I dismissed those letters as being penned by ham-fisted people that maybe should take up another hobby like boxing or caber tossing. Whilst the new 3MT is incredible on the fidelity front, it is almost impossible not to distort or dislodge some of the detail when handling it even with utmost care.
My kit built locos are far more tolerant in this respect, because brass or nickel silver is used for the fine detail rather than flimsy low cost ABS plastic. I wonder if the manufacturers need to look at using such materials rather than plastic - many I'm sure would pay the extra few quid to have something that doesn't fall apart every time it's handled. We cannot expect or want the manufacturers to reduce the level of detail we have come to expect in recent years, but maybe the materials used need to be addressed – what do you think?
Verdict:
- Pros – stunning finish and feel with amazing level of delicate detail. The model captures the look of the real thing very well. An excellent and very useful prototype which could be seen over many parts of the railway network and is equally happy on the mainline or branch whether on goods or passenger service.
- Cons – the delicate detail comes at a price, it’s tricky to handle the model without knocking or distorting some of the fine detail. The excessive amount of lubricating oil gets everywhere and helps to attract hair and dust. Finally, the disintegrating valve gear should not really happen after just 1 hour of careful running in. As is so often the case, build quality is the weak link.
26 December 2009

25 December 2009
Xmas Antidote....

No snow, sparkles or bright coloured baubles here, but a picture of an early sunny morning in late summer:
Now in private ownership, Radstock's former Lancashire and Yorkshire Railway 'Pug' 0-4-0 51202 is captured pottering about with high exposives on a little used section of Cement Quay. Apart from the fake clag, there is no computer jiggerypokery with this snap.
A short while ago I detailed up and repainted the Hornby 'Pug' bought on Ebay. The wagons are from various kits, some of which are getting on for 30 years old, they were recently refurbished to bring the weathering up to current expectations (I hope!).
The cement loading thingamywhotsit is a modified and repainted Skaledale ready to plant structure, the aerial conveyor is Cornerstone (Walthers). Grass is Mini-Natur applied with a Grasmaster, other rocky detritus is the real thing from from Midford in Somerset which was scaled down using a hammer.
24 December 2009
Gilding a Lily
Modern 'ready to plant' resin models are great way to get a quick result. With a little extra work they can easily me modified a little to make them different from the chap's next door. Here's how I changed a Skaledale R8956 Mine Shaft Building with a new roof and some overlays.
 A bit of trial and error was used to mark out and then cut up some stone effect plastic sheet. I used what I had to hand which looks a little like the smaller stone used in the Mendip area.
Colouring at the later stage is probably more important that the type of stone effect used.
The card, once a good neat fit was then fixed into place with impact adhesive. I was care careful not to use too much glue in fear that it might melt the plastic.
Where 2 sides met, I filed the plastic overlay at a 45 degree angle to avoid an unsightly seam. Some liquid plastic solvent was then washed over the corners to smoothen the effect.
To further change the look of the mine shaft building, I added a hipped roof, again from plastic card. Some Wills corrugated sheeting was laid over to complete the effect. Masking tape was used to create the effect leading between the roof and the shaft.
 card. Some Wills corrugated sheeting was laid over to complete the effect. Masking tape was used to create the effect leading between the roof and the shaft.
The next stage was to add some colour. I’m impatient so I like to get the basic colour on quickly. For this I utilise Halford’s aerosol primers. In my arsenal I always have grey, red, white primer and matt black. The can have many applications on model railways from track colouring to weathering.
For the building here I used a mix of red primer and matt black, misting on the paint randomly from a couple of feet away. I used more red on the roof to suggest rust. After this application all over I then masked off the sides and misted on white and grey primer to suggest the effect of dust.
Mendip stone in the Radstock area is very pale, so the next stage was to dry brush on some very pale grey Humbrol matt enamel. 

‘Dry brushing’ if you're not familiar with the practice involves using a fairly stiff brush (I favour those cheap children’s one from craft shops like Hobbycraft). A small amount of the chosen paint is applied to the brush, then with some old newspaper or cardboard most of the paint is then removed.
23 December 2009
Afternoon Milk Arrives at Combwich

Highbridge's Johnson 1P 4-4-0 No. 58086 glides past Combwich signal box with an afternoon service from Templecombe. The 6 wheeled milk tank was probably picked up from Bason Bridge.
To celebrate its 30th birthday, Combwich will next be shown at Wycrail Saturday 6 November 2010 - find out more!
06 December 2009
Foliage

I wasn't totally happy with the look of the foliage on the two major trees on Catcott - it was a little heavy, lifeless and a tad matted. So, a couple of days ago I removed the trees and further teezed the foliage (Woodland Scenics scatter on their Polyfiber) apart to make it very see-through.
A fresh coat of Woodland Scenics 'mid green course turf' and Sylvia wood based scatter a French make picked up at RailExpo '07 in Paris were both applied to diluted PVA. Further light colour adjustment was with aerosol (Racing green amd some 1970's Ford beige) and a diluted bespoke acrylic/pva mix to reduce the playgroup green of commercial scatters. I find diluted PVA far better than the more common hairspay for fixing such into place. Cheaper too!
Pic of the day...

43017 drops off a couple of empty covered vans for bagged peat traffic at Catcott Burtle. September 1953. I think the 'Doodlebug' (Bachmann) looks very American in poise from this angle.
The 'BR-ised' former private owner wagon started life as a private owner Dapol freebee when I renewed my BRM subs. I should sort out some faded running numbers ... not enough days, too little time - a bow pen with some pale grey paint should suffice eventually....
To get such a great depth of field in this shot, two identical image focussed on different key points were combined in Photoshop CS3 using the layer stacking tool in 'Scripts'. A quick 'Google' will show you how.
04 December 2009
Black Five!

Bath's Black 5 No. 45440 was normally limited to the 'Mainline', but on this rare occasion in the late summer of 1956 it was caught dropping off a bogie bolster wagon at Catcott Burtle.
I've had problem with this renumbered Hornby Black 5 never running that well. A few months ago I took the chassis apart to sort out the pickups. The result being that it stopped running completely - the pick-ups being held in place a very odd way. Anyway, to cut a long story short and with my new reading glasses to actually see what I'm doing, I had another go which was successful. 3 hours running in on a circle or track later (dodging the cat who kept trying to knock the loco off) and we have a very sweet runner indeed! Result! There's scope for further weathering in due course - jobs like that are best never rushed.
03 December 2009
Top up with the Grasmaster

The baloney....
58086 slows for Catcott with an afternoon service from Templecombe in August 1956.
Actually..... the real reason for this shot is to show off the topped up static grass using a Noch Grasmaster. The grass on the embankment was a little short, we all know that in real life (though very rarely modelled because most modellers are blind to anything outside the 4 foot because they're so wound up about the rather time expired 16.5mm vs 18.2 vs 18.83mm debate aka 'gauge rage') that rough wild grass can grow to in access of 4 feet in the summer months. The joy of static grass is that to gain extra height all one has to do is build up another layer on top of what's aleady there. The trick is to use paler more straw like tones for the top layer so as to depict the dead feathery tops.
Subscribe to:
Posts (Atom)