Thursday 30 December 2010

Brewhouse Quay: Track Laying

Just before the Xmas holiday I started to lay the track on Brewhouse Quay. The delay in getting the snaps here being due to that increasingly shocking excercise of actually interacting with people face to face (cue the H&S Executive for another new directive no doubt) rather than keyboard, eating all the wrong foods, drinking too much beer in foreign climes and probably in due course getting a dose of lurgy due to all public places being heated to suit the staff rather than the heavilly dressed public.

Initially the plan was to use ready made track, but after messing about with Xtrkcad it came apparent that I would not be able to shoe-horn in the track plan that I wanted in to the small area. And anyway, with nearly all the buildings being ready to plant I needed to have some challenge having not built my own track since Catcott Burtle in 2008.

The track as you'll see is traditional copper clad construction, but rather than using the more usual code 75 bullhead rail I'm aiming for that light railway/industrial look using code 55 flat-bottomed rail marketed by C+L Finescale for OO/HO. Code 55 is about as light a code as one can go in OO realistically to avoid earlier ready to run wheel flanges bouncing along the sleeper tops.
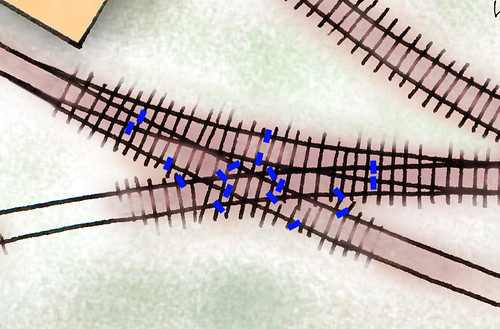
Seen here are the first few inches with rail laid, and those with keen eyes might just notice the destressed copper clad scratched to represent timber. Sleeper gapping to avoid a short circuit is just to the rear of the nearest rail so to avoid an unsightly groove when seen from the front of the layout.
When soldering the rail to copper clad sleepers, to avoid that tell-tail look often seen with blobs of solder on the side of the rail spoiling that flat-bottomed look, I'm pre coating the sleepers with a thin coat of solder and then sweating pre-fluxed rail onto the sleeper surface. Whether I add cosmetic rail spikes remains to be seen, for much of it only the rail tops will be seen protruding out of fine ballast or cobbles and some of the less recent ready to run offerings may just brush the spikes. Such can always be added at a later stage when the layout is nearly complete.

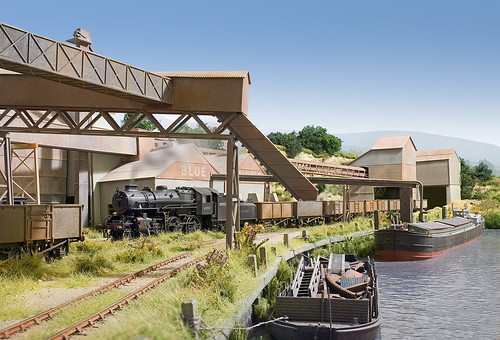
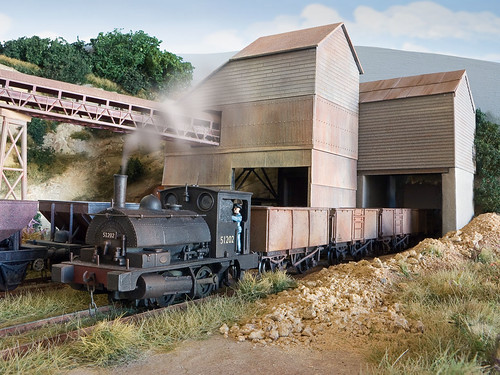
To the right and looking back to 2008, here we have Catcott Burtle after the C+L track was painted with various Halfords primers in preparation for ballasting.

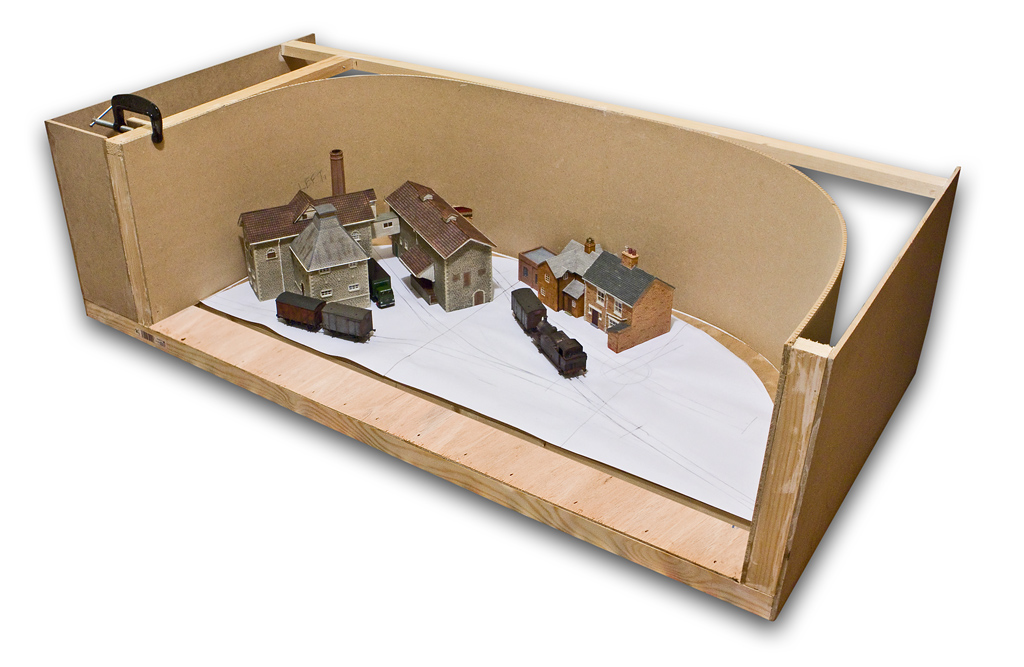
The baseboard top is plywood, but seen above is what looks like a foamboard base - correct! To make track laying easier due to the fixed high backscene that that surrounds 3 of the 4 sides, I'm using a removeable sub baseboard which will then be fixed permanently into place once the more tricky aspects of tracklaying have taken place. In due course, ballasting with diluted PVA could cause the foamboard to delaminate, so to avoid the possiblity of that happening as long as the whole lot is painted prior to ballasting this will not be an issue. As with other projects I generally use a blend of Halfords red primer, grey primer and matt black misted on in varyoing amounts. One could of course use Railmatch 'Sleeper Grime', but Halfords bonds to the metal better, dries faster and can be bought from around the corner.

Thursday Pic - that 7F again....

Here's a spare shot of the new Bachmann SDJR 7F 2-8-0 left over from the other day, and whilst it wasn't taken specifically for the cab detail, it does demonstrate how nice the detail is from a normal viewing angle. I make no apologies for the car which is from a Sprinsgide white metal kit, it's simply there because I like it. The only enhancement is the puff of smoke, again because I like it. The crew are stood on the platfom behind the loco

Click image to enlarge.

Version without the inset HERE!

Tuesday 28 December 2010

Trams and Beer

For a change we decided to escape the Christmas mayhem and head to Munich for a few days, not really for any cultural experience but unashamedly to sup a few beers in the various beer halls all over this beautiful city. And anyway, most things are shut over the Christmas period and let's face it, it's way too cold to do much else so I don't feel the slightest bit guilty in this respect!

Of course one needs to get around, and I was most impressed with the 47 mile tram network and how the Germans don't let a dusting of that cold white stuff cripple everything. Every city should have a tram network, they're quiet, they get you from A to B very quickly and they don't leave everything under a cloud smelly smog every time they move.

I won't drone on any more, there are lots sites that will cover green issues and more of what I've touched above, and anyway whilst Munich is a fabulous place, I haven't had a proper cuppa for days so I'm off to have one now....

Thursday 23 December 2010

Bachmann's Super SDJR 7F 2-8-0


Click on the images to enlarge!

Bachmann's much anticipated SDJR 7F 2-8-0 has finally arrived at Nevard Towers from Hattons in Liverpool, and what a beauty she is too. I'll refrain from commenting in detail too much, because there are many merry souls who get out even less than me who'll no doubt keep the forums bulging over the next couple of months with stuff about the loco that you cannot see.

To me Bachmann have captured the look of this iconic heavy freight loco supremely well having gazed at photographs of the real thing for 30 plus years. In that period I've often thought about building a kit of one of these, but like many there is now little need.

As a nice surprise, Bachmann have added the familiar Whitaker token exchange apparatus to either side of the tender – this was missing from the pre-production model seen back in the summer at their press and trade open day. Thoughtfully they have included what looks like a couple of spares of this in with the detail pack; these might make their way on to another one of my engines in due course.

So the loco can negotiate set track bends, the tender to loco gap is rather too wide for my requirements, but unlike Hornby this can be easily remedied by drilling an extra hole through the metal 'drawbar'. Toy train buffs from Tonbridge Wells will note that I have added the steam heating pipe below the front buffer beam - that is actually not required having examined photos after hurriedly adding the detail pack!

I have yet to run the loco due to lack of time, though I imagine it will be a little notchy as is frequently the norm with Bachmann steam outline locomotives; hopefully though a good running-in session will reduce this to a minimum with choice of controller as usual having an equally significant effect.

Whilst the loco undeniably looks stunning in its shiny black, in due course this little gem will go under the airbrush and dry-brush to add a little well needed ‘work-a-day’ patina. This hopefully will make it more in keeping with a freight locomotive as seen in the last decade of steam.

A couple of years ago, if somebody had posted this release on April Fools’ Day we’d have dismissed them as barking mad! But the last 18 months have seen everything change in this respect with all sorts of weird and wonderful unexpected prototypes appearing ready to run. So, roll on that Johnson 1P 0-4-4 with condensing apparatus next I guess?   

Wednesday 22 December 2010

On the Road Again: Catcott Burtle


nevard_101126_catcott_DSC_0545_web, originally uploaded by nevardmedia.
W I D E C R E E N version HERE! 

Catcott Burtle is on the road again on Saturday 15 January 2011 at the Astolat Model  Railway Circle Expo in Guildford. It's been well over a year since this layout last had an airing in public with it's last scheduled outing sadly being cancelled at the 11th hour due to a house move the day before.

Astolat Model Railway Circle Annual Exhibition
Guildford Methodist Church
Woodbridge Road
Guildford
Surrey
GU1 4RG

9.30 a.m. until 5.00 p.m. Prices not known

Other layout will include:
  • Garden Railway (G)
  • Camas Orainin (Gn15)
  • Boreham MPD (0)
  • Lynton Road (0)
  • Gravel Bottom (016.5)
  • Fisherton Sarun (OO)
  • Lyn Castle (OO)
  • New Bridge Street (OO)
  • Port Skeera (EM)
  • Kite Houses (P4)
  • Bryn-y-Felin (OO9)
  • Lower Peak Wharf (OO9)
  • Prospect Valley (H0)
  • Modbury Tor (3mm TT)
  • Chacombe Junction (N)
  • Champion Falls (N)
  • Hedges Hill Cutting (N)
  • Shackleford Road Wharf (N)

Tuesday 21 December 2010

I'm Not the Only Mad One

I often wonder who really looks at the toy train chuff chuff blogs, frequently imagining that it's just old duffers like me with not enough else for filling to do with their lives. So over the last few days it was a great surprise to get not just one, but two emails from blog owners that do not for one moment appear to be model railway nuts. These merry souls have compiled list of their favourite railway related blogs and rather foolishly chose recommend my misguided jottings and pontifications on this silly hobby. Thank you!
Model train blogs we love
http://www.clifford-james.co.uk/blog/model-train-blogs-we-love/


50 Best Blogs for Train Enthusiasts

Saturday 18 December 2010

Brewhouse Quay: Wiring fun


K_point_wiring_01, originally uploaded by nevardmedia.

Brewhouse Quay update.....

The materials have arrived, so I'm looking at the most complex bit of track well in advance to plan the wiring and where isolating breaks will need to be cut into the rails and how power will be fed to various sections. Slitting the sections will probably be easier after laying due to the fine nature of code 55.

Point operation will be via manual miniature yard levers as in Nigel Burkin's feature in the April 2010 edition of Model Rail. Polarity switching will be under the baseboard, again as per Nigel's feature.

Whilst I'm not new to building my own track, I've never been bold enough to try something like this. Construction doesn't bother me, but the wiring does as little, so any thoughts from people that find this aspect interesting feel free to feed back.

I've uploaded the  multi-layered Photoshop PSD file here to allow the blue isolating  section bits to be added or hidden should anyone want to illustrate any  ideas - credit due course the final write up goes without saying! I need to consider check rails too not shown here.

Thursday 16 December 2010

Merry Christmas and a Happy 2011!


xmascard_2010_WEB, originally uploaded by nevardmedia.
Merry Christmas and a Fabulous 2011!

58086 on a cold but sunny snowy morning in 1957 awaits with the 11am service from Combwich to Evercreech Junction.

Wednesday 15 December 2010

Midnight Oil/Brewhouse Quay Plan

I suffered from a little insomnia last night, so between midnight around and 2 am I worked on my rough brewery trackplan pencil sketch to produce the below using a little Photoshop to tidy up some of the rougher bits. I've tried to avoid that computer look - preferring that 'back of an envelope/organic' style as seen in magazines like the excellent French model railway magazine Voie Libre and the wonderful illustrations of Paul Lunn.

I'm in a lucky position to have  been asked to come up with a model railway idea for a well  known  book  publisher, but to date have been unsure which direction to  go in - if at all with so many other commitments. Maybe a selection  smallish plans mixed  in with a section on how to photograph  what  you've built? Just a silly  idea maybe - any thoughts on this already over saturated market?

Back  to the brewery; 'Brewhouse Quay' is likely to be the name of the  current project, graphically the title works, and it's easy to remember.

Next, I hope to turn off the computer an start to lay some track .....

Monday 13 December 2010

Brewery Project: Back of an Envelope Sketch

Just now I grabbed a couple of snaps to illustrate the Brewery Project's likely track plan all in an area of 4ft x 2ft 3inches, kicking off with an early rough sketch which will be used as a bases for a proper layout plan. Note the sector plate to allow access to hidden sidings behind the backscene. The headshunt seen on the above sketch will allow a small loco with just 2 SWB wagons - a shunting puzzle should be fun!

The track plan has started to be marked out roughly full size onto some sheets of A3. The trackwork in the foreground is one of the reasons why ready made track would not work here. I'm looking forward to hand laying the track, not having done any since Catcott Burtle 3 years ago which used C&L components. For this I have ordered code 55 flat bottomed rail from C&L for that light industrial look

Earlier in the year I had the privilege of photographing Brian Harrap's excellent Quai:87 which features lots of clever trackwork. See Brian's layout in print soon in the popular model railway press.

Sunday 12 December 2010

Sunday's Snap: Under a High Pressure Sky

As a brief reminder of warmer times, under a high pressure summer sky, Ivatt 4MT 2-6-0 No. 43017 pulls away from the stone screens at Cement Quay.

Tech: this shot was simply taken with a long exposure under a single ceiling light in the spare room where Cement Quay was set up for a few days.

  • Bigger version here!

Thursday 9 December 2010

Quickie Brewery Progress


Today a bit of work turning flat earth into a proper baseboard ideal for show presentation. Bendy MDF is great stuff from B&Q and ideal for curvy backscenes.There is still some fascia work and panelling to add of course.
 
The trackplan has come together, it being fed from behind and between the two key brewery buildings. Off stage there will be a sector plate which will feed 3 hidden staging siding behind the backscene. Neither of the 2 exit points will be visible from the normal viewing angle. The sector plate will also complete the run around loop. When I design track plans, I don't resort to computer programmes, they simply don't interest as well as it taking me as long to master the software as to build a whole layout, and anyway, I spend enough time in front of a computer. I use a nice bendy baton to help draw nice sweeping transitional curves using something from the olden days called a *pencil  and *paper  - weird but it works for me. *Google it.

Trackwork despite initial thoughts of using Tillig ready to lay track, this has now changed to building by own using code 55 conductor rail on copper clad from that light railway industrial look - this way I get exactly what I want as with Catcott and Combwich which also feature home constructed track (not Peco as many people think). Generally speaking copper clad runs better, will be more reliable over time, and easily fixed in the event of failure. 

I might turn the two Skaledale houses in shot into brewery offices and with some suitable repainting and weathering I should be able to blend them in with other structures. To their right I quite fancy scratchbuilding building a stone and wood warehouse which could be served by a wagon turntable - though quite whether there's any point in making a working one I'm unsure. 

The slightly lower bit at the baseboard front will allow some kind of canal to be added, to add interest it probably won't be dead straight as here. But as usual, nothing is cast in stone so to speak, and none of the above may happen!

It's sometimes great to have a break from more long term projects with this one so far being a lot of fun. Oh yes, the gauge is OO 'bodgerscale' (I hate 'finescale', it means nothing and if it does, is usually disappointing) with a scenic 3ft 6 x 2ft area on a 4ft x 2ft3 baseboard constructed from ply, stripwood, some MDF, glue and a little blood!

Monday 6 December 2010

Brewery Project Approved by the Cat!


As a brief diversion from my Mendip Colliery project, and because I have a spare freshly made 4ft x 2ft baseboard kicking about as well as a keen magazine editor hungry for stuff like this, I've decided to do a quickie in the form of a brewery based around the excellent Bachmann Scenecraft Oak Hill Brewery buildings.

Interestingly enough, the Oakhill Brewery did really exist, and in the early part of the 20th century was served by a 2ft 6 inch gauge railway from the standard gauge S&DJR at nearby Binegar. Sadly the brewery closed its doors for good in 2004 when its owner retired. The real buildings have however since been converted into private dwellings.


My project will be standard gauge, and whilst I have yet to design a trackplan, it's likely to be a simple run-around loop with a couple of sidings coming off it to allow a little shunting with smaller locomotives like a Pug and the forthcoming Model Rail/Dapol Sentinel


Why the cat? Well she (Fleur) made a pretty picture I'm sure you'll agree, and obviously she approves of the baseboard and buildings dotted about on this fledgeling project.

Mock up of possible brewery layout, with all trains entering and leaving via a tight alleyway between the brewery buildings.

A sneak preview of the Model Rail/Dapol sentinels. See George Dent's BLOG for more photos
 

Friday 3 December 2010

Friday's Photo

Carrying on the theme of steam along the lines of those seen in the excellent Railway Bylines, but on Cement Quay and to remind us of dusty summery days, here's a grab of a Southern Railway built 'Black 8' No. 48660 nearing the end of its days shunting some Dogfish ballast hoppers under the number 2 loading screen.

Lack of hostile responses from the diesel only brigade has confirmed that next time I chase up a show for Cement Quay it will be temporarily exhibited as a steam era layout. The La Farge signs will be removed and the red and white striped works chimney replaced with something a little more old fashioned by borrowing one from Mendip Colliery.
  • A bigger version of the above photo can be seen HERE!

Wednesday 1 December 2010

Sweet Running Hornby Pug

A tiny ex Lancashire & Yorkshire Railway Pug is captured shunting wagons through the loading screen at Cement Quay.

This little loco I picked up on Ebay just over a year ago, it has since had a repaint, a renumber to one of Radstock's shunters, a little extra detail and a dose weathering.

After completing the above and being an 0-4-0 I wasn't expecting the best performance, with some sticking, wobble and jerkiness due to just 4 wheels. But, after a good run in and widening the wheels to the non-OO spec back to back of 14.7mm it runs a dream through all sorts of track from Peco to handbuilt C & L. I'm sure the widening is the key because the reduced side to to side play has improved electrical pick up. I notice too that this little loco is again part of Hornby's 2011 range. All we need now is one of the keen cottage etchers to produce a replacment cab, the plastic one looking rather too thick, just cabside overlays would do - any takers?