Tuesday 25 September 2018

3 x 1 Plank

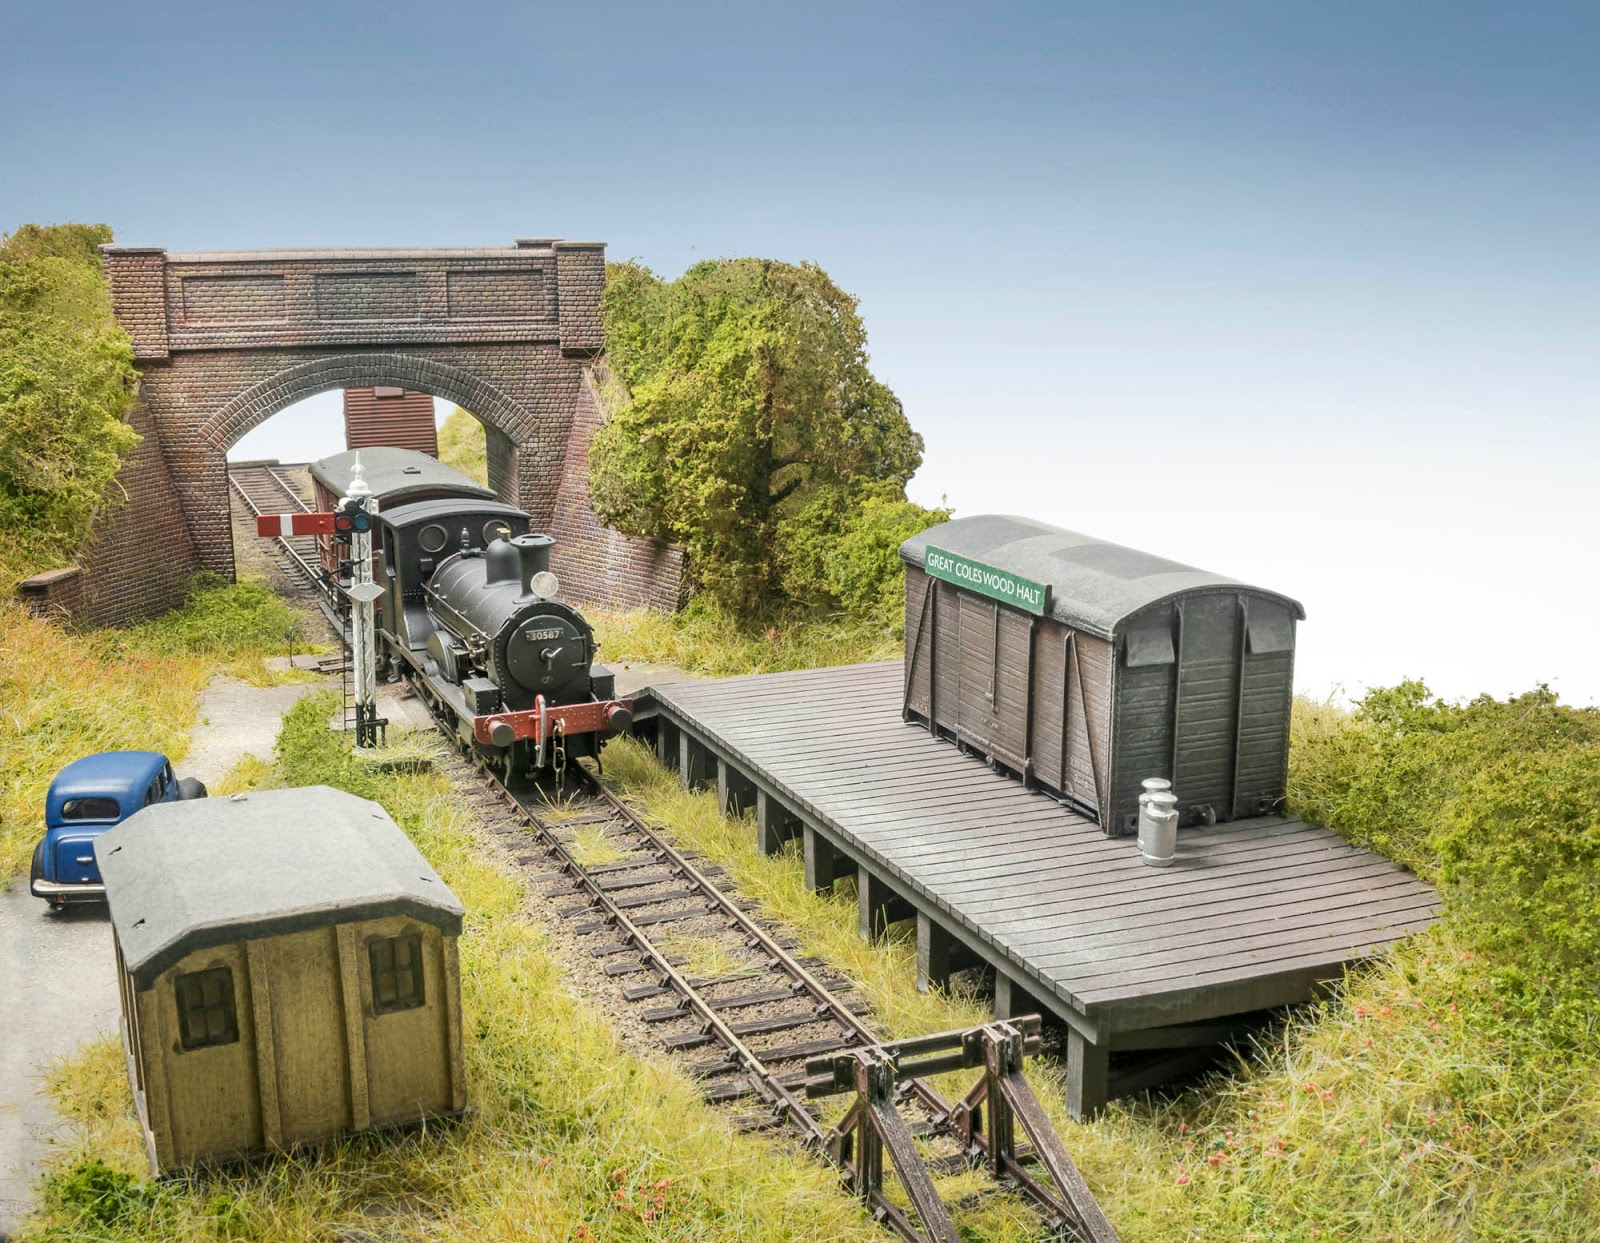
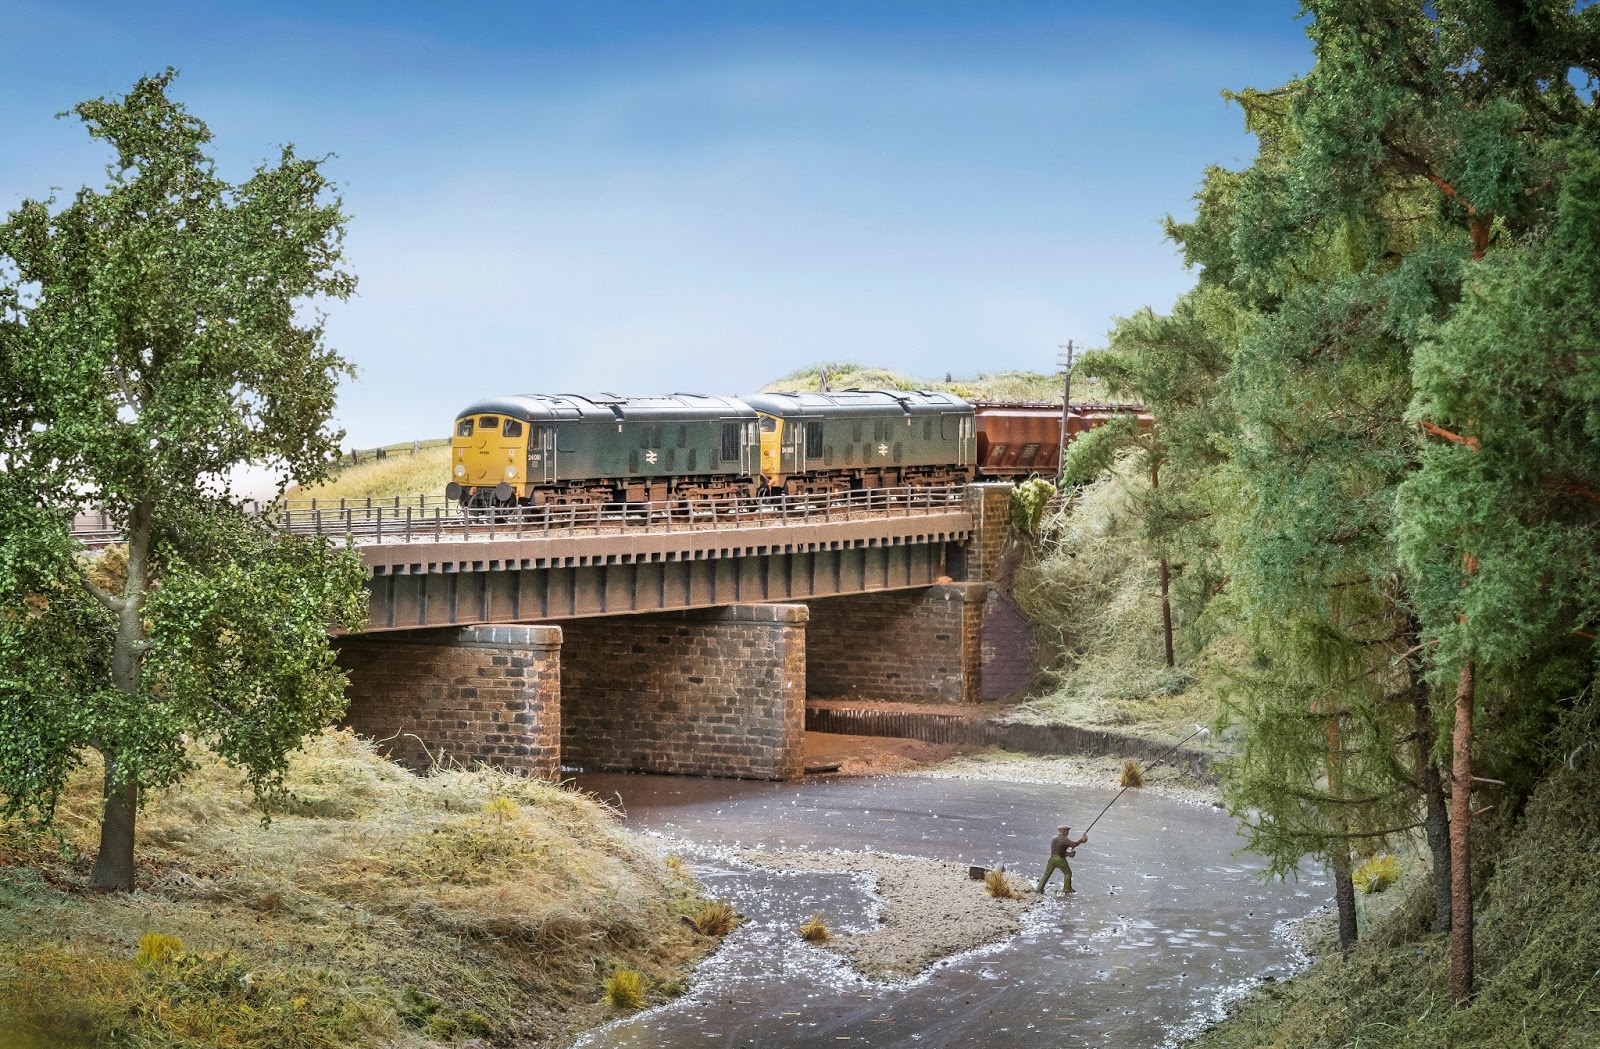
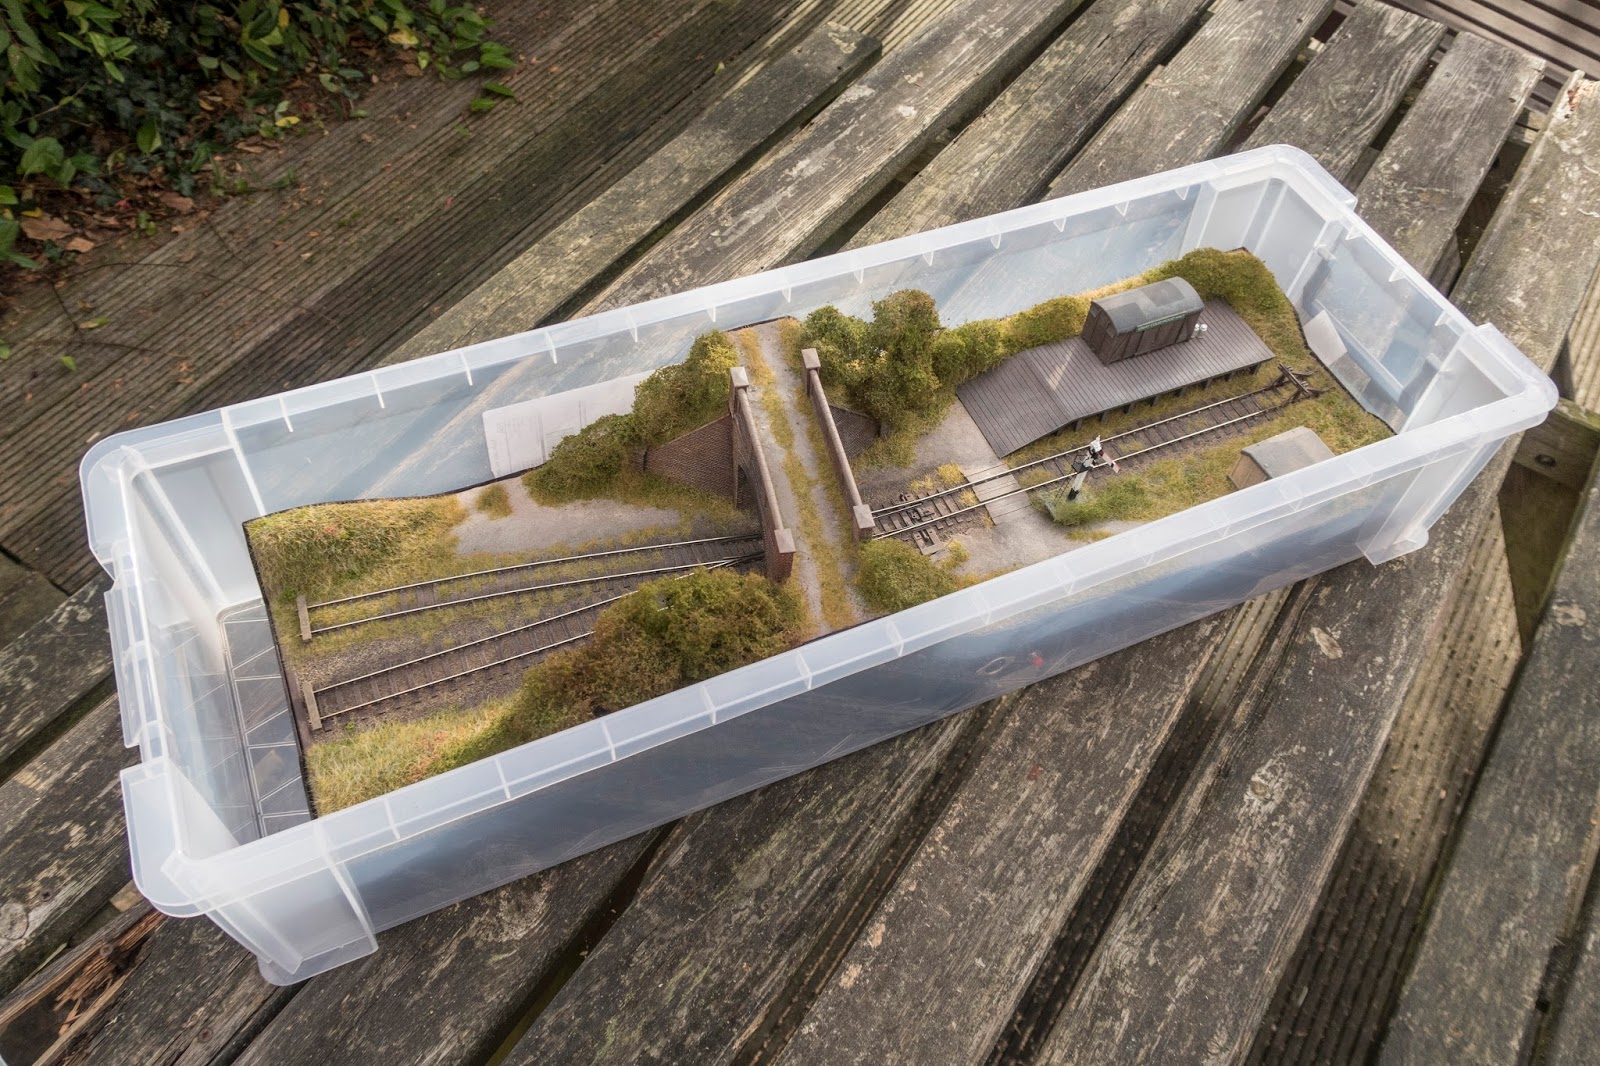
A personal quickie I worked on last week for me between commercial jobs, all on a 3x1 plank. The inspiration is the Wisbech and Upwell Tramway, a mostly unfenced railway that ran next to, or actually along the road in deepest Cambridgeshire through to the 1960’s. Give it a Google.

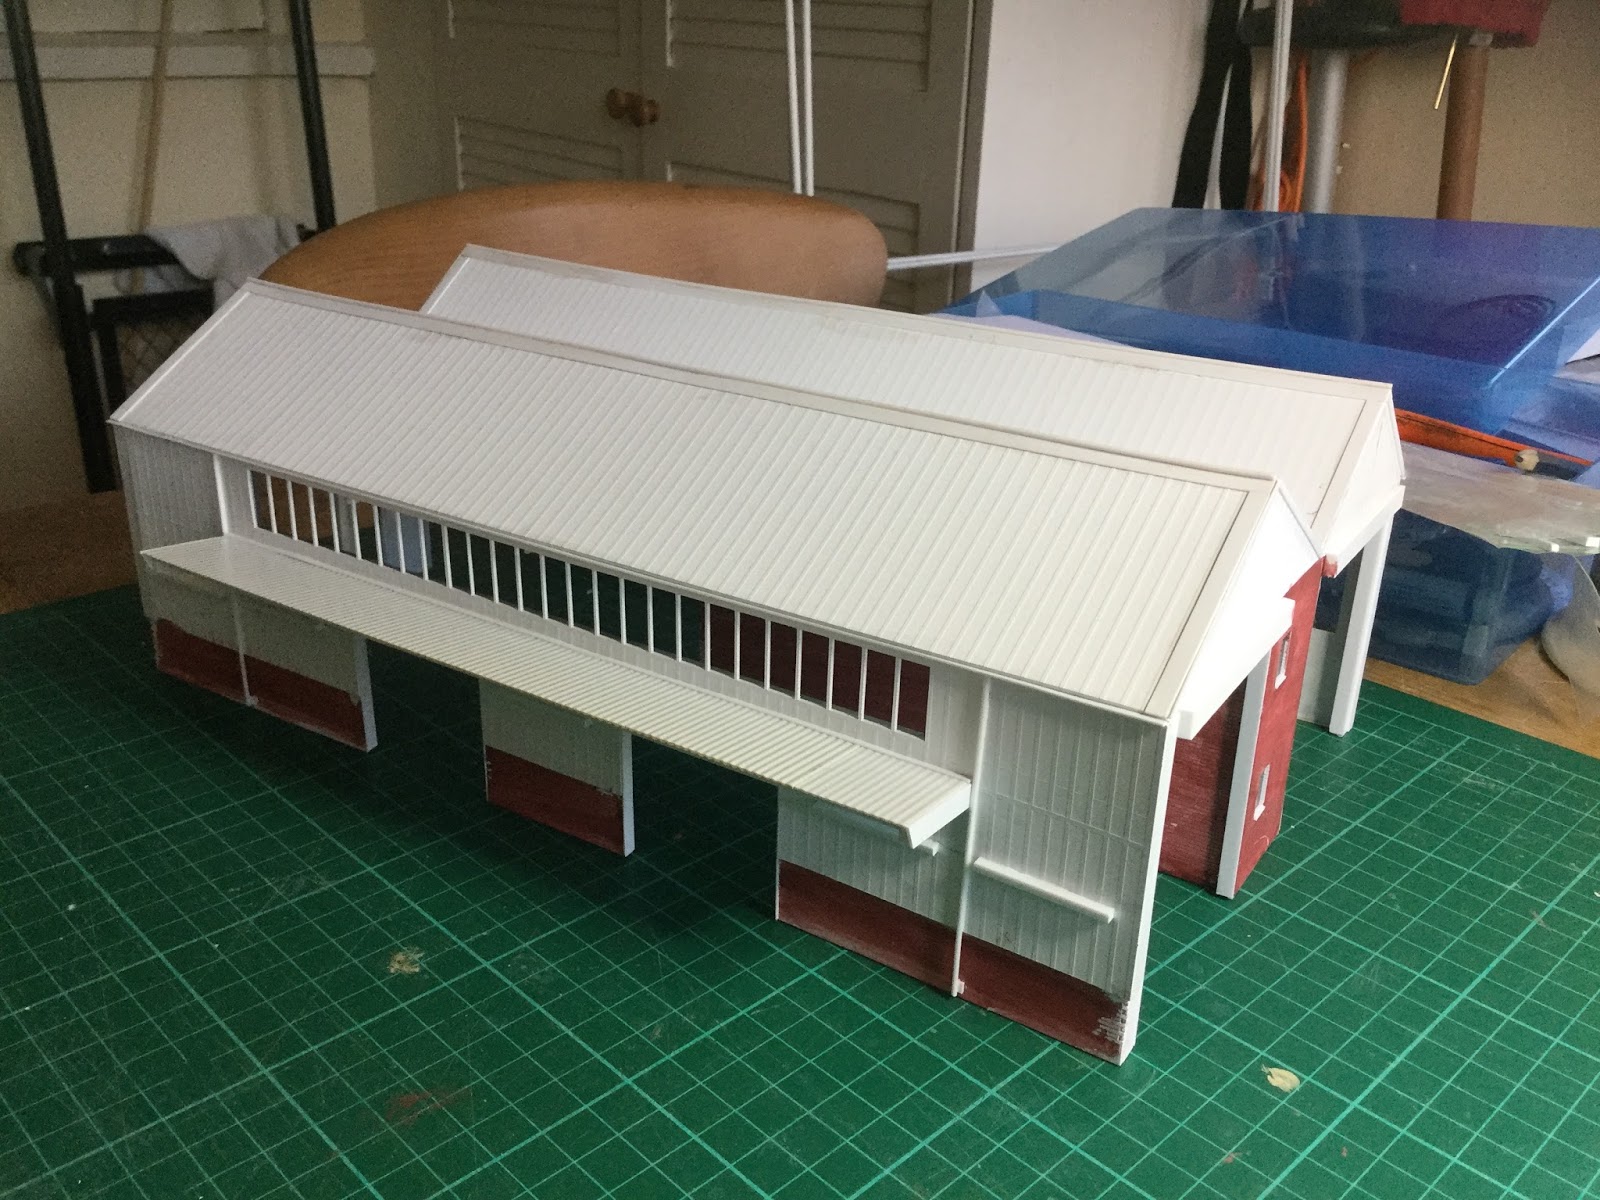
The wonderful town buildings were a lucky secondhand find, they just had to be used, they were very much the catalyst for this speedy project. The buildings are at least at least 30 years old and once lived on a much bigger layout which has since been broken up. Sadly I have no further information to hand. If you know of the layout or the builder, please comment in the comments section.

The windmill is an Airfix/Dapol kit knocked up in the spring, in reality such a structure would have fallen out of use a good century before the railway came. The rail served shed with door is a chopped up Bachmann colliery wash-house modified with pitch roof and doors. Its use is a mystery, maybe a paintshop for pumpkins or storage for pedant’s ruck sacks. The other shed, another ready to plonk thing that had been gathering dust.

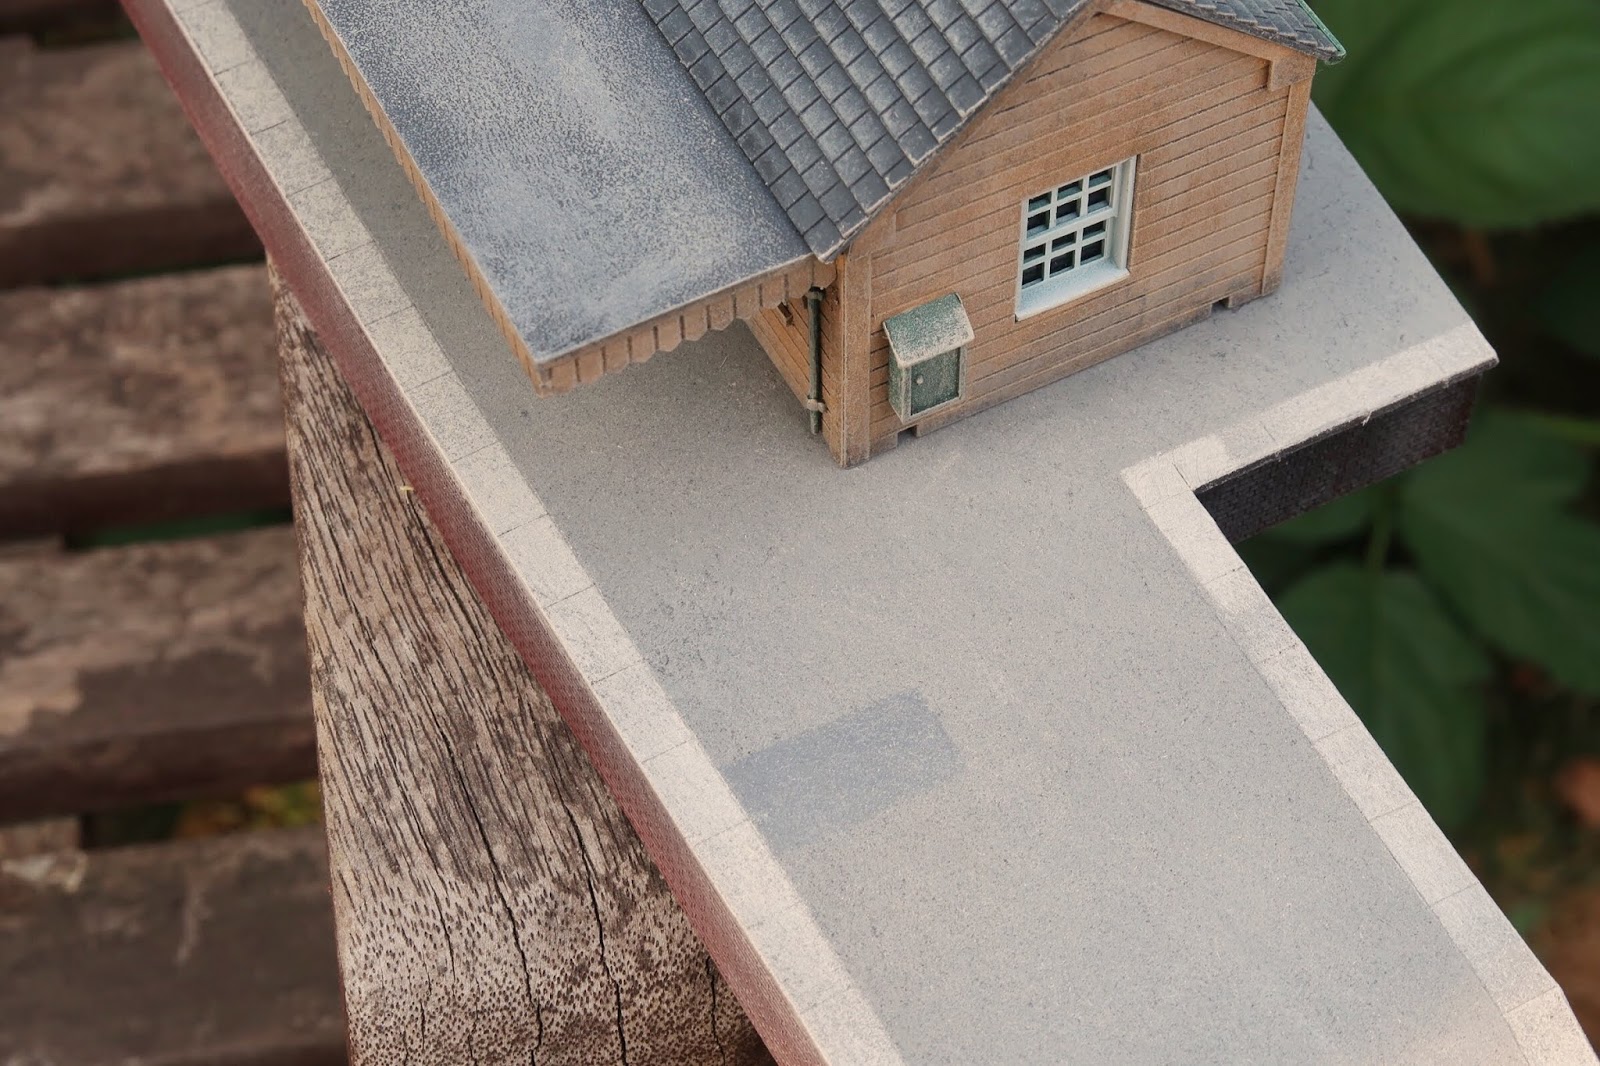
Track is PECO, ballasted with sieved grit from our local common. The cheapo quickie cobbles were created using the empty shell of a ballpoint pen pressed in to Das clay. All in all around 18 hours work, this project being more an assembly of existing bits than a true build.

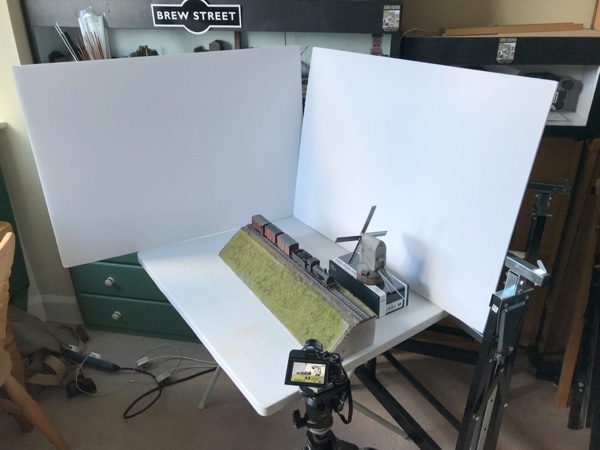
It will link in to other modules in due course to allow through running. At some stage it will live in an illuminated diorama case to fit it with my other layouts. Track has been aligned so it can connect to my other layout Brew Street. I’ve Brew Street booked in to the Rochdale Expo In April 2019, so will probaby add this module.

Click on photos above and below for a bigger view...

Saturday 25 August 2018

85 Hours

A little customer commission I’m just finishing off. Scenic footprint just 4x1 feet (fiddle yard extra on left hand side still to be built). It depicts a Colonel Stephens-ish branch line terminus. A bit of a squeeze, but managed to get a run around loop in just long enough for two passenger carriages.

The motley selection buildings are a selection of well known kits and a grubbed up Bachmann wooden engine shed. Track is good old fashioned copper clad which allowed me to fit everything to the small footprint, not be restricted by ready made point geometry. The diorama case is Tim Horn laser kit. For the first time I tried out LED lighting, a mix of warm and cool strips. The backscene my own creation printed at the local printers.

Around 85 hours,  working on and off, beginning first week of last month. I’ve wanted to build something like this for some time, having a passion for olde worlde run down middle of nowhere.

Click on the photos for bigger views you can really zoom in to!

Saturday 18 August 2018

BBQ Skewers

Passing the loading gauge on Polbrook Gurney Colliery. I used code 55 rail here for that lightweight industrial look. Filing the point switch blades takes moments with such fine profile rail.

Note one of my ‘budget’ yard lamps. Bbq skewer, bent nail with a slice of plastic tube. 5 mins work. Bamboo blinds make an inexpensive source of fine bamboo otherwise, the lean-to was made from such. Scale OO 1/76. 

Click on the above photo for a bigger view.

Thursday 16 August 2018

Sticky Backed Plastic

Model railway commission update: 

I picked up the photo printed backscene a short while ago (from AJ Signs in Guildford).

It is intentionally over sized to allow me to trim 3 or 4 cm off the base so it looks right from just above track level. It is simply inserted in to the diorama case temporarily for this photo.

Scenic work will hide the transition from 2D to 3D. The backscene is printed on to matt laminated sticky backed plastic, which in turn will be stuck in to card to allow for curved corners.

I hope to complete this little layout very shortly. More updates soon.

Click for a bigger view....

Sunday 12 August 2018

Thanks Allan

Click on the photo to enlarge

There are many ways to weather models, here’s a Dapol (Airfix) water tower/tank kit (a bargain that can be found for around 6 or 7 ££££) after a blast of a few primers. 

I usually start with the black and mist over the other shades. The yellow filler primer is fairly new to me, you can use it for lightly misting over Model trees along with the red for an early autumn look too. 

Here’s the result after 2 or 3 minutes. Further work can be performed with washes and dry brushing if desired. 

These paints are very toxic, so always work outside if you can and consider a breathing mask. Posh people will have a spray booth. 

I have to acknowledge the late Allan Downes for this aerosol paint tip. 

Saturday 11 August 2018

Terminus in a Box


Some progress with a little Colonel Stephens style branch line terminus commission. Next to go in will be the backscene which is currently at the printers and some brighter than normal LED lighting which arrived a short while ago. I’ll then be able to perform the scenic work which will transform things dramatically. The little holes along the front now have inset tiny toggle switches for electric point operation. I’ll post more updates soon. Scale 1/76, this space is 4 x 1 feet.

Click on the photo for a bigger view

Saturday 28 July 2018

Peco Lineside LK 200 Wooden Station


For my current customer project based on a Colonel Stephens style branchline terminus in OO (1/76 scale), I'm using the Peco Lineside LK 200 Wooden Station building kit, which for the price between £10 and £15 depending on where you buy it from is a steal.

Peco produce 3 different versions of the kit, this is the 'wooden' version, which uses a laser cut MDF building shell and a plastic injection moulded roof plus other details. Peco also produce 'brick' and a 'stone' versions  - those are available as all plastic kits.


The build took 4 hours which included the painting time - a nice afternoon project sitting in the garden. The instructions recommend impact adhesive for gluing the MDF bits, but I find that super glue/cyanoacrylate adhesive better, if only because you don't get all the associated stringy threads of glue.

The kit is supplied with a base, which to be honest is pointless, all that will do is make it impossible to get inside the building, if like me you want to add the window glazing after painting. Some clever types might want to add lighting too.  Irritatingly, the discarded base clips in to the slots that can be seen around the base. I'll have to fill those in due course or hide them behind station furniture.


Despite the minor gripe regarding the pointless building base and ugly slots to locate it, this kit makes up in to a rather nice backwater railway building, and one that could suit many a scenario irrespective of railway company or region being depicted. To finish I chose a faded green and cream colour scheme, something that could pass for Southern Railway/SR or even LNER. Paints from times long gone soon faded, especially green which was seldom bright and lurid as depicted on many model railways, despite them supposedly being the 'correct colour'.


The little building sits on a platform, for this I built up 3 layers 6mm foamboard and topped it off with a mounting board top - all bonded together with PVA. Brick effect plastic card was added to the sides. The card top had edging stones scribed on with a scalpel. The platform initially looks too deep, but once the track is laid next to it, the height will be about right. In the UK platforms are a lot higher  than most other parts of the world, just use less layers of foam board!


Looking down on to the platform, picking out the edging stones in a lighter shade and adding a few repairs adds interest. I used interior matt emulsion paint - increasingly I find myself using such for card structures, they also have the advantage in that they have a little texture - especially if stippled as they dry.


Friday 6 July 2018

Mini Branch Line Terminus


Progress with my current commission. A OO Gauge (1/76) branch line terminus in a foot print of 4 x 1 feet. Exit left to fiddle yard.

I’m using traditional copper clad point construction here, one of the joys being that a track plan can be drawn to fit the space. Not a straight piece of track here for greater visual appeal.

Once the track is constructed, the foamcore base will be glued on to the plywood baseboard- a Tim Horn diorama case/baseboard. Laying track inside a diorama case would require the skills of a contortionist - this gets around that.

Saturday 2 June 2018

Nano Layout?


Finally finished the tiniest layout I’ve ever built. Just 14x4 inches without fiddle yard. Designed to live in a small plastic storage box. Working in such a small scale and footprint definitely sharpens up my act, the camera getting a lot closer than the eye! This was a commission, the owner supplying the baseboard with a length of track pinned down - my job was to decorate it to make it look ‘West Country’. I’ll miss this one when it goes on Monday. Could such a small layout (if it can be called that) be a new sub genre #nanolayout ? Rule: 2 square feet? 

Saturday 10 March 2018

Somewhere in Suffolk


A little fun in the studio, messing about with one of my photo planks, a grubbed up Hornby J15 and a recently built Airfix windmill. The background is a bit of computer jiggerypokery, because I didn’t have the time to build the entire scene. Recreating these mock ups, I find quite useful when planning layout ideas, if only to see what works, or not. Click on the photo above for a bigger version.

Later this year I plan build a small East Anglian themed layout when I have time between build commissions for other people. Knocking up all the buildings on weekends between my weekday commercial work is the way forward - the actual layout build can then be quite speedy.

Here is the original set up, just a couple of sheets on white foam board, simply lit with some natural window light. For budding photographers, I highly recommend knocking up a little length of grassy embankment with track. If you don’t want to mess about indoors with your camera, fun can outside with a real background.

Thursday 8 March 2018

March 2018 Update

March 2018 update...

Since moving in to model making commissions the diary has been filling up nicely, keeping me nice an busy when not out on the road for Model Rail magazine. My photography often involves a lot of driving, so as a balance it's great to work in my studio at home - especially with the recent snowy conditions. Here is a quick precise of what's been going on....
An N gauge 'nano layout' - just awaits a photo backscene. Click to enlarge
Another layout in a box! My current project as seen above, has been to complete a tiny N gauge depiction of the Kyle of Lochalsh for a customer - all designed to fit in to one of those plastic storage crates. The photo above shows it awaiting a proper backscene which is currently at the printers. Excuse the ropey mobile phone snap above - I'll do a proper shoot of it before handing it over. 

The owner, being deeply smitten with Pete Matcham's stunning 2mm fine scale layout, asked me to build something similar - but with my own slant - it would be wrong to build an exact clone. The baseboards were supplied with the track already laid, my job being to decorate it with buildings and scenery - the station building being a complete scratchbuild.
Kyle of Lochalsh in February - what a lovely backscene! Click to enlarge
Working in N gauge really sharpens up ones model making because you get in a lot closer with a camera - highlighting any rough bits! I'll come back to this project shortly with some proper photographs once the backscene (currently at the local printers) is in place.

Gateshead Fuel Shed. Click to enlarge
Also on the work bench is a 4mm scale model of Gateshead fueling shed, a stalled project originating from a rather rough laser cut kit. It is  currently in the hands of miniature metalwork expert Graham Bone having some intricate brass work added to the roof - before coming back to me for completion. Here is is halfway through the build.

Adams Radial tank - in early Bluebell Railway guise. Click to enlarge
A fun little job over the Christmas break was to depict the Bluebell Railway's Adams Radial tank as it arrived shortly after withdrawal from British Railways. The time worn loco initially had its BR numbering a logo painted over for a short while before being painted in to LSWR colours. The delightful Hornby model was used for this.

Below, some previous projects, follow the links for the proper stories...

Hazelbank - a Scottish Borderland beauty. Click to enlarge
Refurbishing layouts can be great fun - older scenery methods make a great base for contemporary materials. An awful lot of static grass was required for this 21 x 15 foot layout - along with over 60 bespoke trees. This job was spread over 4 busy days. More here http://nevardmedia.blogspot.co.uk/2018/01/scotland.html

Great Coles Wood Halt
A layout in a box! http://nevardmedia.blogspot.co.uk/2018/01/layout-in-box.html

Pottendorf
Pottendorf http://nevardmedia.blogspot.co.uk/2017/10/a-german-commission.html

Friday 5 January 2018

LNWR Webb Coal Tank

 A little bit of loco tweaking last Monday. A Bachmann LNWR Webb Coal Tank renumbered and weathered (washes and dry brush, sealed under a top coat of Tamiya Matt). It was originally in LMS livery. The smokebox dart needs to be swapped out for a later type, as and when I find something.
A crew still needs to be added along with some real coal

This useful little loco looks very at home on Brew Street. It's a very good runner too, ideal for a shunting layout this one.

Wednesday 3 January 2018

Scotland

In December I was as a commercial job invited up to the Scottish Borders to give a Hazelbank a scenic up and under. The layout depicting a could have been scenerio on the Waverley Route is 21 x 15 feet - so 3 whole days were spent messing about with static grass and around 60 assorted trees.

Fresh static grass was applied over the existing tired scenery, selecting suitable colours to depict a late summer/early autumn feel.

Left. This is a new view on Hazelbank, new trees add a whole new feel to the place - the model being a Scottish Borderland scenero.

In addition to trees and static grass, the the mountain river 'Gala Water' has been given a refresh too.

If you want to know more about Hazelbank (pre-refurbishment) follow this link www.sdeg.co.uk/layout-information

Drop me a line if you have a layout that needs a bit of TLC

Monday 1 January 2018

Layout in a Box!

Brakevan rides today!
Happy New Year!

Apologies for the lack of posts here, I've been rather busy with photographic shoots for Model Rail magazine and more recently a few commercial model making commissions. Drop me a line

Enough of that, back in the autumn I was approached to build a layout in a box. I must admit to not really looking at plastic storage boxes to house a layout until then, but the owner needed to be able to store the layout under a bed or on-end in a cupboard when not in use.

Everything had  to be completely self contained in a foot print of 80 x 30cm - and being a fan and serial builder or micro layouts, I enjoy the challenge to see what can be squeezed in, whilst still creating a believable scenario so this was right up me street.

The scenario to be depicted was that of the early days on the Bluebell Railway, featuring a truncated railway halt for brake van rides - Freshfield Halt being some of the inspiration with the line running through a shallow cutting.
The layout is fully scenic, this end can be used as a fiddle yard.
Nice an tidy - just 80 x 30cm! There's scope for projects like this to be extended

If you enjoy these daily post, feel free to buy me a bev  https://www.buymeacoffee.com/Nevardmedi3