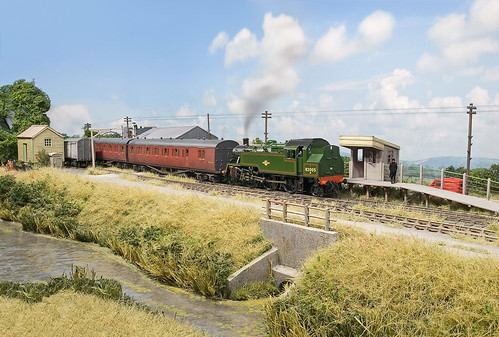
A spanking gleaming brand new Bachmann BR Std. 3MT with an ex GWR B set slows for Catcott Burtle.

About Me
- Chris Nevard Model Railways & Photography
- Professional Photographer, Model Maker, Writer & Pretend Musician
Thursday 31 December 2009
Sunday 27 December 2009
Bachmann BR Std. Class 3MT - a layman's review.....
I like many have really been looking forward to this release of what is a very useful and attractive workmanlike engine.
In ready to run form, the nearest prototype we’ve had to this is probably the Bachmann Ivatt Class 2 tank which despite being a good model in its day is now getting a little long in the tooth.
Enter the Bachmann BR Std. 3MT 2-6-2; the first thing I noticed was the new style of smart packaging which allows one to see the actual model without having to open the box. The way this has been done is very innovative, though I must admit that it took me a couple of minutes to work out how to get in - the clear sleeve confusing me!
First impression is the super fine paint job, the green having a wonderful freshly polished look about it with very finely executed lining in finest Swindon style. Examining the locomotive in greater detail I thought that maybe I had some grease from my dinner on my hands, but no, the chassis is very heavily lubricated with some kind of light machine oil with appears to get everywhere. I guess this is to ensure the fine valve gear and other moving parts have minimal friction – maybe a tad overdone with this particular example. The locomotive is very finely detailed, and if you’re comparing it to the old Ivatt Class 2 tank, this is a totally different beast – it looks absolutely stunning with the level of delicate detail and finish possibly setting it above what could be achieved with even the finest crafted kit.
As for strict millimetre accuracy I won’t comment because I’m not a ‘loco-ist’, but to me it captures the feel of the real thing perfectly, with the ¾ rear view being particularly attractive.
After adding the detail pack (which I have to say was a doddle even after a couple of pints of ale) it was time to run the loco in. Most will test the running before adding the detail pack just in case it's duff and needs to be returned, I rarely use common sense when it comes to model railways!
Last night my circle of track was laid (3rd radius set-track is about as tight as one can go with the front steps added) and the pretty little locomotive was given a good running-in to get everything to bed in nicely. After about an hour of silky smooth gliding around the circle of track in both directions, it suddenly ground to a halt. I thought at first the cat had swiped the locomotive, but no, the eccentric crank on one side had somehow or other come adrift and could be seen swinging from the expansion link even though the retaining screw was still in situ.After bit of muttering and the use of a small screwdriver, I managed a successful reassembly (with a dash of cyano for good measure which will no doubt void the guarantee) and all is now well. In time it will be interesting to read whether anyone else suffers this problem.
Eccentric crank aside, which is down to poor assembly; you may have read recently in the modelling press about that maybe RTR is becoming too delicate? Until now I dismissed those letters as being penned by ham-fisted people that maybe should take up another hobby like boxing or caber tossing. Whilst the new 3MT is incredible on the fidelity front, it is almost impossible not to distort or dislodge some of the detail when handling it even with utmost care.
My kit built locos are far more tolerant in this respect, because brass or nickel silver is used for the fine detail rather than flimsy low cost ABS plastic. I wonder if the manufacturers need to look at using such materials rather than plastic - many I'm sure would pay the extra few quid to have something that doesn't fall apart every time it's handled. We cannot expect or want the manufacturers to reduce the level of detail we have come to expect in recent years, but maybe the materials used need to be addressed – what do you think?
Verdict:
- Pros – stunning finish and feel with amazing level of delicate detail. The model captures the look of the real thing very well. An excellent and very useful prototype which could be seen over many parts of the railway network and is equally happy on the mainline or branch whether on goods or passenger service.
- Cons – the delicate detail comes at a price, it’s tricky to handle the model without knocking or distorting some of the fine detail. The excessive amount of lubricating oil gets everywhere and helps to attract hair and dust. Finally, the disintegrating valve gear should not really happen after just 1 hour of careful running in. As is so often the case, build quality is the weak link.
Saturday 26 December 2009
Friday 25 December 2009
Xmas Antidote....

No snow, sparkles or bright coloured baubles here, but a picture of an early sunny morning in late summer:
Now in private ownership, Radstock's former Lancashire and Yorkshire Railway 'Pug' 0-4-0 51202 is captured pottering about with high exposives on a little used section of Cement Quay. Apart from the fake clag, there is no computer jiggerypokery with this snap.
A short while ago I detailed up and repainted the Hornby 'Pug' bought on Ebay. The wagons are from various kits, some of which are getting on for 30 years old, they were recently refurbished to bring the weathering up to current expectations (I hope!).
The cement loading thingamywhotsit is a modified and repainted Skaledale ready to plant structure, the aerial conveyor is Cornerstone (Walthers). Grass is Mini-Natur applied with a Grasmaster, other rocky detritus is the real thing from from Midford in Somerset which was scaled down using a hammer.
Thursday 24 December 2009
Gilding a Lily
Modern 'ready to plant' resin models are great way to get a quick result. With a little extra work they can easily me modified a little to make them different from the chap's next door. Here's how I changed a Skaledale R8956 Mine Shaft Building with a new roof and some overlays.
 A bit of trial and error was used to mark out and then cut up some stone effect plastic sheet. I used what I had to hand which looks a little like the smaller stone used in the Mendip area.
Colouring at the later stage is probably more important that the type of stone effect used.
The card, once a good neat fit was then fixed into place with impact adhesive. I was care careful not to use too much glue in fear that it might melt the plastic.
Where 2 sides met, I filed the plastic overlay at a 45 degree angle to avoid an unsightly seam. Some liquid plastic solvent was then washed over the corners to smoothen the effect.
To further change the look of the mine shaft building, I added a hipped roof, again from plastic card. Some Wills corrugated sheeting was laid over to complete the effect. Masking tape was used to create the effect leading between the roof and the shaft.
 card. Some Wills corrugated sheeting was laid over to complete the effect. Masking tape was used to create the effect leading between the roof and the shaft.
The next stage was to add some colour. I’m impatient so I like to get the basic colour on quickly. For this I utilise Halford’s aerosol primers. In my arsenal I always have grey, red, white primer and matt black. The can have many applications on model railways from track colouring to weathering.
For the building here I used a mix of red primer and matt black, misting on the paint randomly from a couple of feet away. I used more red on the roof to suggest rust. After this application all over I then masked off the sides and misted on white and grey primer to suggest the effect of dust.
Mendip stone in the Radstock area is very pale, so the next stage was to dry brush on some very pale grey Humbrol matt enamel. 

‘Dry brushing’ if you're not familiar with the practice involves using a fairly stiff brush (I favour those cheap children’s one from craft shops like Hobbycraft). A small amount of the chosen paint is applied to the brush, then with some old newspaper or cardboard most of the paint is then removed.
Wednesday 23 December 2009
Afternoon Milk Arrives at Combwich
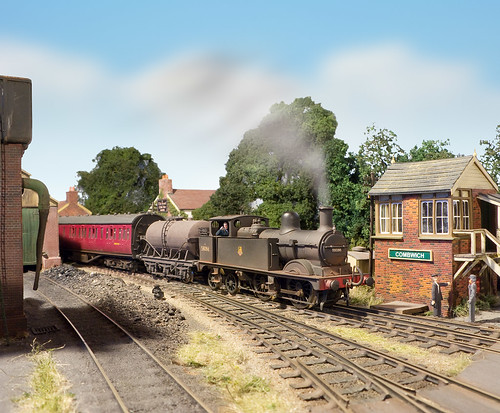
Highbridge's Johnson 1P 4-4-0 No. 58086 glides past Combwich signal box with an afternoon service from Templecombe. The 6 wheeled milk tank was probably picked up from Bason Bridge.
To celebrate its 30th birthday, Combwich will next be shown at Wycrail Saturday 6 November 2010 - find out more!
Sunday 6 December 2009
Foliage
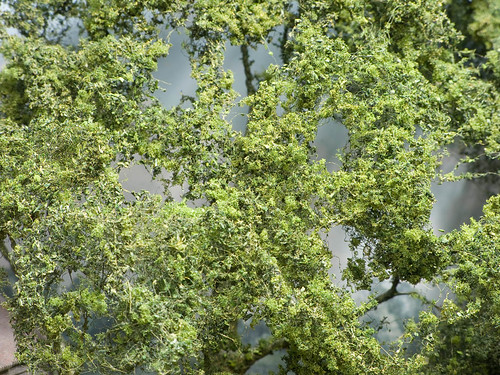
I wasn't totally happy with the look of the foliage on the two major trees on Catcott - it was a little heavy, lifeless and a tad matted. So, a couple of days ago I removed the trees and further teezed the foliage (Woodland Scenics scatter on their Polyfiber) apart to make it very see-through.
A fresh coat of Woodland Scenics 'mid green course turf' and Sylvia wood based scatter a French make picked up at RailExpo '07 in Paris were both applied to diluted PVA. Further light colour adjustment was with aerosol (Racing green amd some 1970's Ford beige) and a diluted bespoke acrylic/pva mix to reduce the playgroup green of commercial scatters. I find diluted PVA far better than the more common hairspay for fixing such into place. Cheaper too!
Pic of the day...
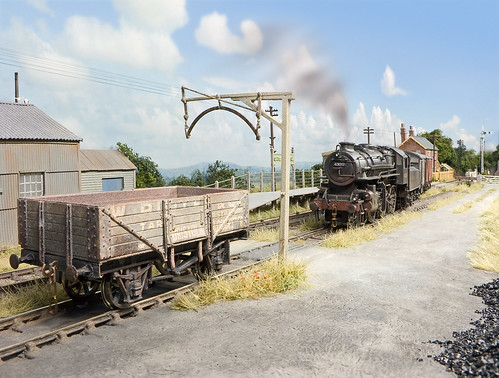
43017 drops off a couple of empty covered vans for bagged peat traffic at Catcott Burtle. September 1953. I think the 'Doodlebug' (Bachmann) looks very American in poise from this angle.
The 'BR-ised' former private owner wagon started life as a private owner Dapol freebee when I renewed my BRM subs. I should sort out some faded running numbers ... not enough days, too little time - a bow pen with some pale grey paint should suffice eventually....
To get such a great depth of field in this shot, two identical image focussed on different key points were combined in Photoshop CS3 using the layer stacking tool in 'Scripts'. A quick 'Google' will show you how.
Friday 4 December 2009
Black Five!
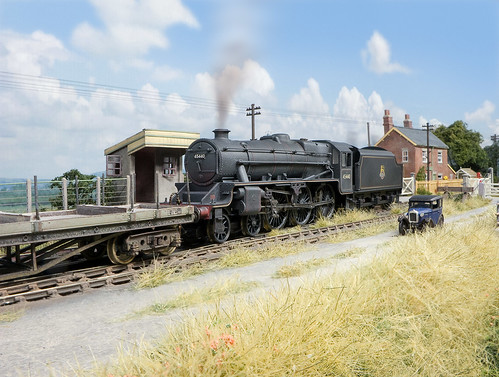
Bath's Black 5 No. 45440 was normally limited to the 'Mainline', but on this rare occasion in the late summer of 1956 it was caught dropping off a bogie bolster wagon at Catcott Burtle.
I've had problem with this renumbered Hornby Black 5 never running that well. A few months ago I took the chassis apart to sort out the pickups. The result being that it stopped running completely - the pick-ups being held in place a very odd way. Anyway, to cut a long story short and with my new reading glasses to actually see what I'm doing, I had another go which was successful. 3 hours running in on a circle or track later (dodging the cat who kept trying to knock the loco off) and we have a very sweet runner indeed! Result! There's scope for further weathering in due course - jobs like that are best never rushed.
Thursday 3 December 2009
Top up with the Grasmaster

The baloney....
58086 slows for Catcott with an afternoon service from Templecombe in August 1956.
Actually..... the real reason for this shot is to show off the topped up static grass using a Noch Grasmaster. The grass on the embankment was a little short, we all know that in real life (though very rarely modelled because most modellers are blind to anything outside the 4 foot because they're so wound up about the rather time expired 16.5mm vs 18.2 vs 18.83mm debate aka 'gauge rage') that rough wild grass can grow to in access of 4 feet in the summer months. The joy of static grass is that to gain extra height all one has to do is build up another layer on top of what's aleady there. The trick is to use paler more straw like tones for the top layer so as to depict the dead feathery tops.
Monday 30 November 2009
Cut and Shove!

British Rail Class 121, number W55033 slows for Catcott Burtle with a Glastonbury to Highbridge shuttle in September 1971.
The unit here is a 'cut and shove' from a Lima 2 car unit in the early 1980's. Recently a Black Beetle power unit replaced the time expired Lima pancake unit. The chassis needs a little work to straighten it out!
The real W55033 now lives on the Colne Valley Railway.
Saturday 28 November 2009
Elderly Airfix gets a fix!
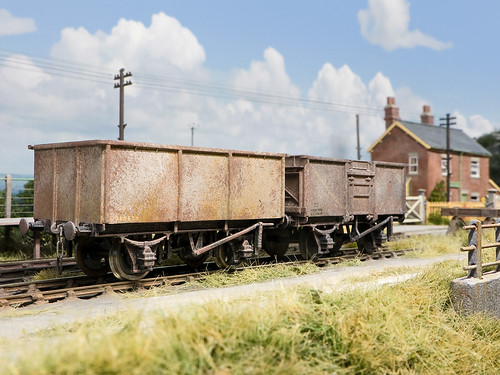
Recently I inherited a dozen or so mineral wagons made up from 1960's vintage Airfix kits. Whilst they were very well made, the builder never painted them but did add the transfers. In an attempt to bring them up to modern expectations but without the additional work of stripping all the transfers off I decided to weather them as I do my buildings. When performing this, I drybrush on various greys, rust reds and then dust on grey primer and matt black from Halfords aerosols. An effective and quick fix - just another 10 or so to do!
Wednesday 25 November 2009
Lady Penelope
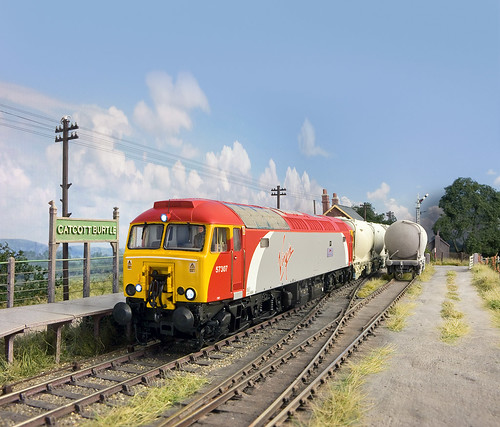
The bull: With Driver Bearton in charge, Virgin Class 57 No. 57307 'Lady Penelope' is captured passing through the 'heritage station' of Catcott Burtle with a Westbury to Moorswater cement working.
The model: a Bachmann Class 57, the layout is my 'could have been' 1950/60's depiction of the rural Somerset Levels.
Wednesday 18 November 2009
The Pug and the Chummy

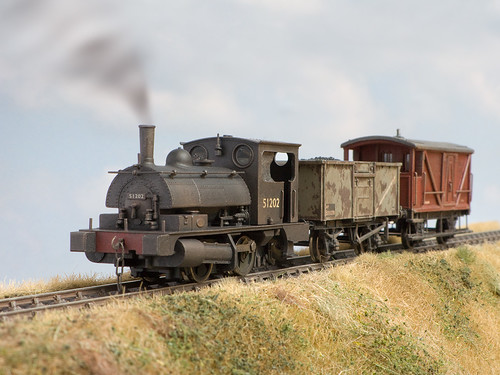
Radstock's 'Pug' No 51202 made a very unusual appearance shunting the sidings at Catcott Burtle one bright Tuesday in September 1952.
The 'Pug' which is a 2004 vintage Hornby offering was picked up on Ebay back in the summer. I have added additional detail, a repaint, renumber and weathering. Much to my surprise it is a delightful runner. Opening out the wheel back-to-backs to just under 15mm have minimised any tendency to waddle and allow the little loco to negotiate C&L pointwork with no problems. Prototypically, the overall look is quite close, the thickness of the cab apertures are probably the weakest link.
The Austin 7 is from a Springside kit.
Pug!
A detailed, repainted and weathered Hornby L&Y 0-4-0 'Pug'. 51202 was based at Radstock from the 1930's through to the early 1950's.
The motor protrudes into the cab, so to disguise this, a cloth screen from painted tissue has been added. Screens like this were an occasional feature on the real thing.
The motor protrudes into the cab, so to disguise this, a cloth screen from painted tissue has been added. Screens like this were an occasional feature on the real thing.
Sunday 15 November 2009
Old Dog
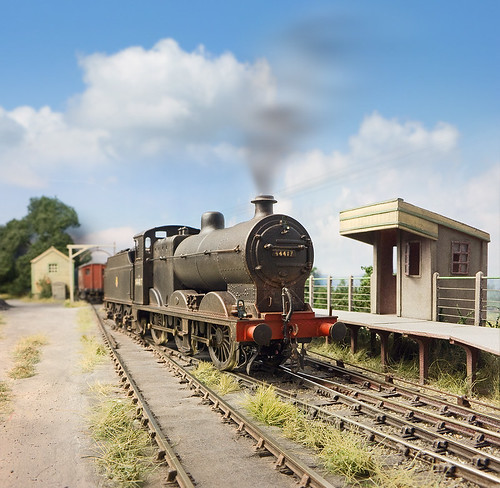
The reality: this is just an excuse for another shot of my re-chassied and detailed up 1981 vintage Airfix Midland 4F as it is captured sliding across into the short siding at Catcott Burtle.
The bull: Midland 4F No. 44417 became the subject for well known SDJR photographer Ivan Locksmith to test out some Ektrachrome X on his new Planar lensed Rolleiflex f3.5. The location is Catcott Burtle and the date is 21 August 1961.
Wednesday 11 November 2009
A Moment in Time......
Templecombe's Midland 4F No. 44417 is captured here trundling through Catcott Burtle with what I imagine is an Evercreech Junction to Highbridge goods. The slide mount on the colour transparency would suggest that the Kodachrome II slide was captured on the photographer's new Voigtländer Vitomatic II in the late summer of 1963. Has anyone any further thoughts on this?
Sunday 8 November 2009
Wycrail 2009

Well, Cement Quay and its new 'mini me' survived it first outing in extending form at the excellent Wycrail. Not only is the layout 60% bigger it's also higher (4ft 3") - it now sharing Catcott Burtle's legs and drape, which I hope improved the experience for viewer.
Just after the doors opened, some weird electrical fault cause total failure for a minute or two, I think this may have been caused by me snagging the wiring loom whilst rather hastily shoving the dustbin liner cocooned layout into the car during a rain storm on Friday night. A grope of the wiring to ensure that maybe a couple of droppers weren't touching and shorting appeared to solve the problem (I have a 1978 MGB with Lucas/Prince of Darkness electrics so I'm used to groping electrics in a mindless way to get a result).
Ergonomically the layout really is too big to use the original control panel on one end which was OK for a layout which in its original form was just over 5 feet long. I'm tempted to simply go back to manual under baseboard push pull point control using rods which is simple to work and easy to fix. The same will be said of the Spratt and Winkles, whilst they uncouple when you want them to, they also do the same thing when you don't. Additionally the hook tends to get in the way and bind with loco buffer beam detail and cause the odd derailment when going over a crossover. So, back to three links in due course I fear - they're bullet proof and so easy to install (I'm still 3 link with all my steam stock and it's going to remain that way).
I still need to sort out the lighting on the extension, it doesn't match the main section despite same scenic colours and illumination. The problem lies with the bulb positioning which I'll address in due course.
Picture above: next outing will be steam/early diesel (not forever) - I favour the idea of and evolving layout to keep things fresh.
Just when we think we've caught up with European ready to run.....

Just when we think we’ve caught up with European ready to run they’ve already jumped to the next stage……..
OK, I probably beng a little unfair becuase things have moved on in leaps and bounds in recent years – well on the looks front at least. Where we are still very much behind, is running qualities with examples varying enormously between what should be identical locos – especially when it comes to steam outline and short wheelbase variety.
The simply stunning Brawa V15 shunting locomotive (Road no. V 15 2231, 2271) runs and good as it looks - the running being way and above anything that comes out of the big three in the UK.
I'm sure you'll agree that this little loco which looks very happy indeed on Cement Quay. It was borrowed from Model Rail regular Peter Marriott for a few minutes during Wycrail on Saturday 7 November 2009.
Thursday 5 November 2009
The Cement Quay - LIVE at Wycrail - Sat 7 November 2009

Cement Quay and its 'bit on the side', 'little bother', 'son of', big sister or whatever you want to call it hits the road this weekend for one day only in its extended format at the highly regarded Wycrail in High Wycombe.
Wycrail, the annual show of the High Wycombe and District Model Railway Society is held at the beginning of November at:
John Hampden Grammar School
Marlow Hill
High Wycombe
Bucks HP11 1SZ
Open 10am till 5pm
See you there?
Hornby Magazine Yearbook No.2
 I've just obtained a copy this year's book and I'm amazed how busy Mike and his team have been (including a few snaps from me). I did know that Mike had been secretly building a new layout not seen in HM and had been out photographing other layouts - now I know what for!
 Also unique to this book is further modelling inspiration, history and tips from Hornby Mag regulars James Lavery, Phil Parker and Evan Green-Hughes. All this is neatly printed on 127 pages of A4 format high quality paper (with great repro) and sandwiched inside solid glossy card cover.
Monday 2 November 2009
Updating a quarter of a century old ready to run loco

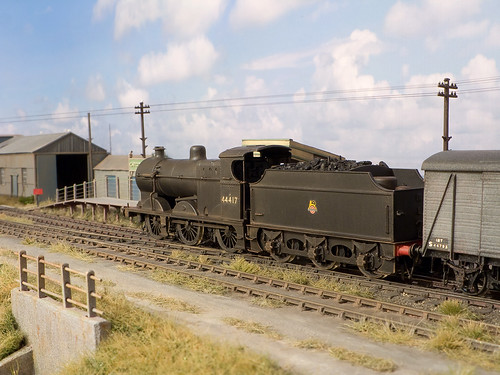
1982 vintage Airfix Midland 4F 0-6-0. Repainted with Humbrol and finished with Krylon Matte Medium, detailed with lamp irons, separate handrails and renumbered as Bath Green Park's 44417 by Chris Nevard. The chassis and tender frames are Comet built by Philip Hall and are fully compensated, ditto on the tender whose weight bears on the rear dragbeam, with pickups on all wheels. The running quality is way beyond anything that could be achieved ready to run.
The locomotive still awaits full couplings and weathering.
Tuesday 27 October 2009
59005 ‘Kenneth J Painter’

59005 ‘Kenneth J Painter’ slowly eases a short rake of MFA high sided aggregate wagons out from under the screen at Cement Quay Old Wharf during the late summer of 2007.
Dear Kenneth is a Hornby/Lima 59 with a modified from end to represent the earlier design with US lamps etc. Additional details are from A1 and Shawplan.
The photograph: this was taken under the layout's own lighting. There is nothing fake added, this is the view that the eye sees. The only jiggery has been to extend the depth of field by layer stacking.
Pernicious Palisade
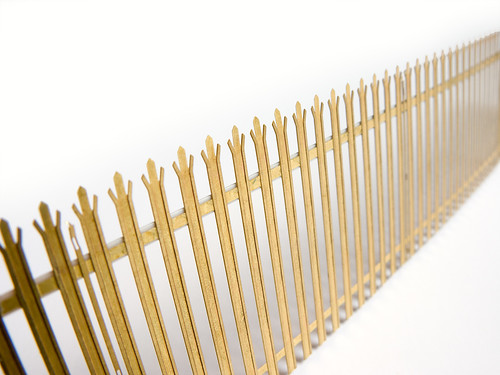
For some truly lethal looking miniature palisade, new kid on the block PH Designs have introduced an etched brass design that will please even the most critical 'N' 'HO'/'OO' and '0 gauge' enthusiasts
Finishing is straightforward, with a blast of grey automotive primer giving a good representation of the galvanised steel finish of the real thing.
Go to www.phd-design.co.uk/ to find out more.......
Monday 26 October 2009
Exit Stage Right!

Update 25 October 2009: The new exit off stage on Cement Quay's right had side is in the process of being disguised with another screen. The top half will be finshed in a similar fashion to the existing screen but will have a bare concrete base. More on this to follow later in the week.
Thursday 15 October 2009
Joining the two modules together!

 Earlier today, the two boards were offered together on the new higher (4' 3") trestles I share with Catcott. This is the viewing angle for someone around 6 foot high. Total length scenic is 9 foot x 2 foot. I may operate from the front or behind depending on how scary the audience are when out on the road. The open end on the right hand end allows a wider viewing angle for the punters.
Wednesday 14 October 2009
Further Cement Quay extension progress

Further cement Quay extension progress.
It's all neatly tidied up (with top and rear all boxed in too) seen without lighting pelmet. The white splodges in the water is another layer of PVA drying (goes clear when set).
Last night I joined it up to Cement Quay proper again to align the lighting pelmet height.
Just 3 weeks to Wycrail now.....
Triang Blue Pullman
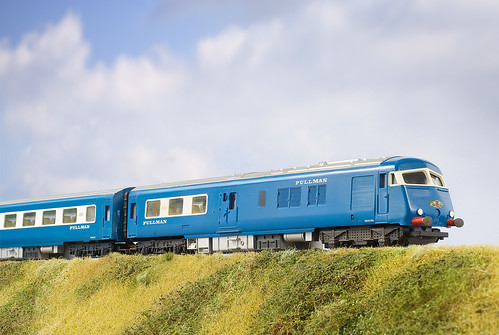
A Triang Blue Pullman from the mid 1960's. This model must have been quite something in its day. Even now it still looks good, especially the glazing on the parlour cars.
Sunday 11 October 2009
Railway Modelling FAQS

Railway Modelling FAQS
Written and photographed by Ian Futers, Peter Marriott, Chris Nevard and Pelle Søeborg
Order your copy right now on
Written and photographed by Ian Futers, Peter Marriott, Chris Nevard and Pelle Søeborg
Order your copy right now on
01778 392 002 - quote 'Nevardmedia Blog'
Have you ever wondered how railway modelling experts get great looking grass, track or even water? Or maybe you are confused by all the different scales, gauges and other model railway jargon?
No longer do you need to be baffled, broiled and bamboozled – 4 highly acclaimed railway modelling experts, Ian Futers, Peter Marriott, Chris Nevard and Pelle Søeborg answer over 75 questions that frequently confuse and mystify those new and experienced with what has to be the world’s greatest hobby!
'Written by some of the best contemporary modellers, the book is an excellent reference work for the modeller's bookshelf no matter of what gauge or era of the world they model'
Modern Locomotives Illustrated, Jan 2010.
Railway Modelling FAQS is published by Warner Group Publications – the home of British Railway Modelling.
Links:
National Festival of Railway Modelling
www.warners-exhibitions.co.uk/railway-modelling/national/
British Railway Modelling
http://www.brmodelling.co.uk/
Thursday 8 October 2009
Catcott Burtle - Top Drawer!
 Catcott Crossing Keeper’s Cottage was one of many on the Highbridge Branch. Due to the remoteness of the line many were without running water and electricity.
With much time between passing trains and little in the way of money, it was quite normal to grow vegetables for the table with railway land being allocated for such matters. I recall seeing lineside allotments as late as the 1980’s, though sadly in this health and safety and bean-counter dominated world this has become a thing of the past.
Note the outside privy to the right of the kitchen, then try to imagine the experience at 3am on a cold wet night with a westerly in January, maybe not?
- This and other 'in' and 'out takes' for my recent feature in July '09 Hornby Magazine can now be enjoyed here: http://www.nevardmedia5.fotopic.net/c1672495_1.html
Tuesday 29 September 2009
All aboard the 2.15pm Service from Bleakhouse Road to Combwich!

After several years of eager anticipation and discussion, the High Wycombe and District Model Railway Society have created a rare opportunity for this overdue pairing of railways to at last become reality - but only for one day!
On the day, the highlight will be the anticipated running of passenger and goods trains between Bleakhouse Road - Tim Maddocks' wonderful bucolic portrayal of the Somerset Levels and Combwich - Chris Nevard's web famous, but exhibition shy layout based on the banks of the River Parrett.
 Both layouts have appeared in the model railway press on numerous occasions over the years. Although both fictitious interpretations of the real S&DJR, due to the ‘could have been’ nature of the projects Tim Maddocks and Chris Nevard frequently get communications via the internet from railway hungry web surfers asking more about the real locations. Chris only recently had an email from a chap in the real Combwich wondering if the railway actually ran through his garden!
To find out more:
Bleakhouse Road www.enginewood.co.uk/bleakh.htm
Combwich www.nevardmedia5.fotopic.net/show_group.php?id=4542
Wycrail www.hwdmrs.org.uk/Wycrail.htm
Wednesday 23 September 2009
Cement Quay Extra! Kettles & Photosynthesis!

Yesterday, I built up another conveyor from the scraps bin (Cornerstone left-overs) and some pipes (Pikestuff - err I think) - no idea what they do, won't lose any sleep over that....
Update this morning, a barrage of sea-foam, various foliage materials, flocks, moss, dried miniature ferns (pinched from the mother in law's arrangements)more static grass, crushed Somerset limestone (from an actual S&DJR cutting at Midford).
Friday 11 September 2009
Cement Quay gets a Big Screen!

A slight departure from the original plan, I have decided to add another screen, this one might be for sand, who knows. It's unusual for a loading screen to be on a dead end siding, but it adds a little extra operational and visual interest maybe (there are now 2 screens in total)......
This one was knocked/scratched up on Wednesday evening in front the of the telly from a few plastic card odds and ends and bits left over from the Walthers cement works kit used on Cement Quay proper. It was painted yesterday morning using my usual mix of Halfords primers and emulsion washes (took about 45 mins in total). The pipe with tap on the side was added just because it looked pretty - maybe it's for beer? The conveyor is a kit again courtesy of Walthers (Model Junction - ta Sam Bennett for tracking this down). Both these structures need proper bedding in still.....
The 'water' still needs to be added to the wharf.
Tuesday 8 September 2009
Whirlwind Progress on Cement Quay Extra...

It's amazing what limiting ones time here on RM Web can do. Friday things were bare, but despite a busy weekend in the real world I managed to find a few hours to have a bash with a Grasmaster (the grass here scales out about bum height, in the high summer it can get alot higher than this) and get started with the scenic work. Lots to do yet, weeds, bushes, a proper disguise for the exit (pipes, bushes etc. ), water and maybe another loading screen to add a point of focus. I think it even works with steam motive power too in the form of good old 43017....
There are no computer graphics here - all 'as is' just photographed under single bulb in the ceiling (10 sec exposure on a Canon G9). The backsdrop is painted very simply with pale blue, greys and greens all mixed with the same pale blue used for the sky so to match in with Cement Quay proper. I think the lack of a sharp corner in the backscene is a bonus here.
Thursday 3 September 2009
Cement Quay Extension Progress 1 Sept 2009

Due to the depth of the Peco I decided to ballast the track first with some beach sand prior to applying the Humbrol Dry Clay.
I used tile grout rather that plaster - why? Because I had a tub in the garage. The bases of the spoil heaps which will be covered in real crushed limestone are cones of cardboard - they're seen here covered in grout and a wash of emulsion.
Much of the exposed rock will have grass (Silfor, Hanging basket liner and Noch Static Grass) and weeds covering it.
The orange dry clay once set was coloured with various pale organic shades of interior matt emulsion - the same colours as used for Cement Quay ('Clotted cream', 'pebbles', 'chocolate shake'.)
Although it's tricky to see it now, the arid moonscape seen here in due course will look like this shot of Cement Quay once treated http://www.nevardmedia5.fotopic.net/p55447178.html
Wednesday 26 August 2009
Shillingstone Preservation Update
On Wednesday 19 August I popped into Shillingstone to catch up with what’s been going on. Not having been there since 2001, I was amazed at the amount of progress. The quality of the work is all to a very high standard indeed! The official project website can be followed here http://www.shillingstone.addr.com/
More pictures from my trip can be seen here http://nevardmedia.fotopic.net/c1745423.html
Sunday 16 August 2009
Cement Quay extension progress, 12 August 2009

Cement Quay extension progress, 12 August 2009. This is a mockup with some CGI to gauge how it might look in due course (deadline 7 Nov 09 - WycRail Expo)
An overdue update showing antics over the last week as promised.....
The stone sheet on the wharf is according to my local Addlestone Models a new ready painted product from Peco. I bought it because that's all they had in stock (it will see use on Radstock Coal and Steam too I'm sure). In the event however the stone and wood will be washed over and dry brushed with various shades of grey, beige and green using my usual matt emulsions. Colouring and techniques will be the same as Cement Quay proper to ensure continuity.
I have on order some Walther's conveyors as on Cement Quay here.
www.nevardmedia5.fotopic.net/p55447179.html
Tuesday 4 August 2009
Further extension progress

3 August 2009; some midway baseboard progress for Cement Quay's 3ft 6 x 2ft extension. Note the hybrid construction of timber, hardboard and foam board (the bases for this is in fact a set of disused folding legs!). Why? That's because I had these items to hand - waste not, want not. The track (Peco large radius curved code 75 points which will have all the nasty bits trimmed off and SMP bullhead for the plain track) is just temporarily placed for effect. Between the 2 vertical uprights (which will support a lighting pelmet) will be a curved 1/16 inch thick by 1 foot high marine plywood backdrop - I'll be adding that next, with apertures for the two exiting tracks linking to the existing layout (with the exit to the right going to a cassette yard behind the backscene).
Tuesday 28 July 2009
Eye Eye!

At Cement Quay's last outing back in January it became obvious that operationally the layout could be a little more interesting if another fiddle yard was added to the right hand side. Sidings and headshunts on the right were originally designed with this in mind. Almost 3 years on and I have started to put this into action. The nice folk at Wycrail (the layout's next out in November) have very kindly granted me the extra space, so, as not to disappoint I though I'd better start.
Rather than simply add another fiddle yard, I might as well run something scenic along the front (quarry and further wharfage), this will make the existing 5'6 now 9ft.
Thursday 23 July 2009
Bespoke Motive Power for the Quay

Pete Harvey's LaFarge modified Bachmann class 20 as featured in Hornby Magazine December 2007.
'm very happy to now have this locomotive in my ownership - cheers Pete, thanks for offreing it to me! Here she is propelling a short rake of cement PCAs along the wharf at Cement Quay.
Saturday 18 July 2009
New Life in the Old Dog

I've had this old tender drive Airfix 4F for quarter of a century, and for most of that time it has been in desparately need of a proper loco-drive chassis.
Being seriously crap when it comes to chassis construction (being far happier with track, buildings and scenics) so thought I'd treat myself to the skills of an expert in this field. As a birthday and christmas pressie to me, local loco building guru Phil Hall built and added a Comet chassie to the old dog. It really is the dog's danglies with full compensation, all wheel pick up etc - runs a dream. Phil has left me to do it up, paint and weather the loco - that's the bit I enjoy.
The odd missing bit under the boiler has be filled in by Phil. The splashers do look a little big here, building a new kit body would probably be easier than replacing them, so it ain't going to happen.
Pic courtesy Philip Hall
Friday 12 June 2009
July '09 Hornby Magazine - shameless plug....
 OK, I admit, this one really is a little self indulgent, July Hornby Magazine is Catcott Burtle's first proper editorial debut so I am going to give it a shameless plug along with the mag in general!
Below, excerpt from the Hornby Magazine website...
Editorial
This is Hornby Magazine’s 25th issue. Mike Wild looks back and forward to what’s in store for future issues.
Update
Latest shots of Bachmann’s ‘3MT’ 2-6-2T, Ixion recasts ‘Manor’, and Mike Wild reviews the Bristol exhibition of May 1-3.
Exhibition preview
A preview of Hartlepool Model Rail Group’s exhibition on July 11-12, sponsored by Hornby Magazine.
Catcott Burtle
Chris Nevard’s stunning ‘might have been’ take on part of the Somerset & Dorset shows just how much atmosphere can be squeezed into a small layout.
Parkers Guide
In the first of a new series tackling rolling stock kit building, Phil Parker builds two different mineral wagons and shows how he did it in step-by-step guides.
Scenes from Life
Coal merchants were common sights at many goods yards all over Britain. James Lavery builds a typical facility and shows how to create a realistic cobbled yard surface.
Digital Command Control
Hornby’s Select controller is a tempting proposition to add to an existing set-up. Ian Morton looks at how to make the most of multi-controller operation using Hornby’s DCC system.
The Melbridge Box Company
Phil Parker proves size doesn’t matter with his fascinating ‘OO’ scale layout – built in two A4 box files!
Taking stock
Cases for storing and transporting rolling stock can be expensive, but Chris Nevard shows that an A4 box file can also be converted into a cheap and effective carrier.
Favourite models
One of the longest-lived and most popular models ever is Triang’s ‘Jinty’ 0-6-0T. Evan Green-Hughes looks at the history and development of this iconic model.
Hornby Post
A bumper Hornby Post with views on everything from electrics to the Underground.
Garrochburn
Mike Bisset’s loft layout takes us to South-West Scotland and the rarely-modelled ex-GSWR lines, which saw an extraordinary variety of traction.
 Smallbrook’s LSWR brake van
Looking for a different vehicle to bring up the rear of a goods train? Chris Nevard has the answer with this delightful 10-ton brake van kit from Smallbrook Studios.
Basic Electrics
Ian Morton looks at how working colour light signals can be installed painlessly on layouts ranging from the steam era to the present day.
Reviews
Major releases this month include Dapol’s stunning ‘N’ gauge Class 156 DMU and Mk 3 coaches, as well as the month’s other new models.
Reality Check
To mark the release of Dapol’s Class 156 DMU, Evan Green-Hughes examines the design, operation and detail of these popular workhorses.
Tan-y-Bwlch
The Festiniog Railway in Wales has an atmosphere all of its own and was Britain’s first preserved railway. Angus Watkins explains his fascination with the railway and how he built this ‘OO9’ scale layout.
The Clinic
Hornby Magazine’s modelling doctors answer queries from this month’s patients.
Staff Projects
Bay Street Mk II was ready, but how did its debut at the Bristol show go? Mike Wild reveals all.
Railway Realism
Locomotive sheds were vital features of the steam age but few were identical. Evan Green-Hughes investigates how they operated and what should be included on a model.
Show guide
With Summer looming, Hornby Magazine presents its definitive guide to what’s on over the coming months.
Saturday 30 May 2009
Just a Pipe Dream

PLEASE NOTE THAT THIS IS A SPOOF!!! The result of too much time messing about in Photoshop and just an idle 'what if' bit of fun that would never survive in the real world . . . . .
We are lucky to be very well catered for with excellent model railway magazines in the UK, however this creative spurt of computer graphics has made me ponder my ideal magazine if I was to win the lottery ('cos there's no other way it would survive I guess).
My ficticious title 'Creative Model Railways' would concentrate very much on making things and pushing the boundaries to higher levels of realism than generally seen to date, whilst taking a more balanced approach to modelling the whole railway scene rather than concentrating on stock and track. The influence would be the likes of the delightful Voie Libre and Narrow Gauge & Industrial Review, two magazines that highlight only the very best and the innovative.
Reviews of general new products from the big manufacturers would not feature, after all they're already covered very well by the big four UK mags. I would however like to showcase the small suppliers and 'men in sheds' working in brass, white metal and resin not seen anywhere else in print.
Occasional 'How to' features would be aimed at showing modellers how to achieve advanced levels of realism from people highly qualified in their respective fields - with no snobbery! I've often felt that the higher up the ladder one goes, the more stuffy, cliquey, elderly and elitist things get - fun definately being very low in priority. Design would be friendly, full colour, bold, stylish and of course be printed on fabulous paper with top end repro! The stuffy old B&W only guard would hate it!
Then there would be the layouts, no filler tat at all, zilch! My focus given the choice, would be the smaller homegrown projects which are generally the creation of a single model maker (things designed by committee are never as good?). The magazine would not be era, gauge, scale or even country specific - but everything would need to inspire!!
Subscribe to:
Posts (Atom)