Tuesday 26 June 2012

How to Build a Model Railway

How to Build a Model Railway - New Bookazine!

I've been wanting to write about this for some time, but until now didn't have a clean graphic for the cover short of pointing a camera at my copy. Pathetic I know!

Putting it in it's simplest form spread across 132 pages it's axactly what it says on the cover which is 36 step by step guides about many of those things needed to build a great model railway. It covers all sorts from selecting the right timber, to ballasting, soldering or rewiring a Peco point for better reliability. It's true that many of the Workbench tips have been in print before in Model Rail, but here they all are under one cover, many with new photographs and now printed on nice paper with a quality wipe proof cover!

I've been railway modelling for 30 years, but still found an awful lot to swat up on especially now that there are so many new ways of doing those old chores. When at Railex, I passed a copy around to several experienced modellers, and much to my surprise most commented on what a nice and useful product it is - even for those with many years under their modelling girth. And whilst it even has appeal to those old duffers like me, it's the idea entry point for those new to the hobby, many of the tips saving time and expensive mistakes on that first layout.

It's priced at just £4.99, which I think is great value for money! When I first saw it I was expecting it to have £6.99 price tag, so for this reason alone it's been selling like hot cakes I gather. To get a copy pop into your local model shop, branches of Smiths or call 0844 8488872, but don't hang about because it well sell out!

Some have been asking about the cover layout; it's Model Rail scenic guru Peter Marriott's latest showpiece called Holcombe which will be making its debut shortly as a 'making of' in Model Rail shortly. Peter has a strange affinity for wierd foreign trains, so for the cover snap that's some of my tatty old heaps lurking on there!

Monday 25 June 2012

Favourite Layout: St Merryn

As Model Rail's layout photographer I get to regularly point my lights and cameras at some really cracking layout throughout the course of the year. So rather just just talk about my own bodgings, as a diversion and time permitting I'll reflect on some of the layouts that have made a real impression on me.

St Merryn, is the creation of The South London Group of the Scalefour Society, and beautifully represents a distant Cornish outpost of the Withered Arm of the old London & South Western Railway in the summer of 1954 - The 'Withered Arm' being the popular nickname for the former LSWR west of Exeter in its declining years.

One of the things that makes St Merryn so special is that fact that the builders have chosen to copy the ordinary, selecting the everyday bits and pieces that are such a feature of former LSWR branchlines in Cornwall. It's this ordinaryness thats makes St Merryn so successful, to the extent that many admirers will be reaching of their railway atlases to find the actual location - albeit unsuccessfully!

If you click on the photo above it will be easier to see the detail and textures that really bring St Merryn to life. The summer of 1954 was by all accounts a dreadful one with very little sunlight, this the builders have represented this well with the layout's built in fluorescent lighting giving a soft even illumination much like an overcast but bright day.

The photo above shows the layout in soft sunshine, not something that made an appearence much that summer; however for photographic and illustrative purposes, and to enhance the wonderful modelling I wanted slightly more directional lighting just for this one occasion as well as differentiating it from other photograopher's work. Rest assured however, if you see the layout for real the sun will have gone behinds the clouds again, so remember to take than cardie.

If you want to know a little more about some of  the St Merryn's secrets, I can highly recommend the book dedicated to the layout called 'St Merryn what we did, why, and how we did it'.  Written by the layout's creators, it can be picked up from the exhibitors or the Scalefour exhibition stand for the hugely competative price of £10, which to me is great value for money as well as being a mighty fine read!
  • Should you want to see more of my photos of St Merryn and a full feature on the layout, get yourself the December 2011 issue of Model Rail magazine by calling 0844 848 8872.
  • To see St Merryn for real, it will be taking centre stage at Railex 2013 on 25 & 26 May.

Friday 22 June 2012

‘Lenz 100’ a make of East German taxi?

nevard_120621_BQ_DSC_6247 by nevardmedia
nevard_120621_BQ_DSC_6247, a photo by nevardmedia on Flickr.
When it comes to model trains whilst the day jobs of photography and broadcast telly embrace the latest in technology, I have in contrast never been happy with model railway ‘tech’, having a fear of wires, controllers and all the bits underneath the baseboard that make these models of ours move to some kind of order. I am a Luddite, in fact I am the father of Luddite, being even more tech-sceptical than the most Luddite of Luddites when it comes to toy chuffers.

Given the choice, I am far happier with a paintbrush that a soldering iron, if only for the fact that if I get paint on clothes it may well wash out, but a soldering iron will painfully burn me and make holes in my attire. It does similar things to carpets, so much so that the spare room has a strategically placed rug to hide that molten burn created by me dropping a soldering iron into the cheap synthetic carpets left by the previous owners.

What’s all this got to do with DCC? Well to be honest DCC has never really interested me, certainly not enough to make me want to splash out on such. But because one of my jobs is to visit people with wonderful trainsets, my pals at the magazine have been slowly slipping me bits of DCC stuff to me to try to motivate me into understanding a little more about some of the modellers I visit who increasingly have ‘gone DCC’.

Looking back, this all started off with the loan a ‘Lenz 100’, which I must admit has been sat in my loft since we moved a couple of years ago, the Lenz sounding more like a make of East German taxi than something to do with toy chuffers.

Then the day before yesterday, having all but totally forgotten about that box, I was given a Bachmann Class 24 with built in sound for ‘familiarization purposes’, the thought I think being that ‘it will help me bond with the readers and understand their needs’.

Moving on 24 hours, I’m sat there looking like a small child on Christmas Day with a length of track, a shiny loco, various electronic bits that look like the immobiliser from that East German taxi, and some rather drab wordy looking manuals which look like they’re aimed at software developers rather than Luddite man.

My wife tends to operate the Sky + box at home, for to me it’s a reminder of much of the second rate TV programming I tend to get involved with when not behind a camera. She saw me baffled by Lenz 100 East German Taxi immobiliser instructions, and because woman actually read the instructions she got the loco running to and fro along the yard of track with the same dexterity seen when she flicks between Eastenders and Big Brother whilst recording Big Fat Gypsy Weddings all at the same time.

There was still the problem of the sound, the loco sounding no different to any other loco I’ve played with in the last 30 or so years. The Lenz instructions were a little vague in this area, so they were put back in the box as my wife was engrossed in CSI New York. Next I did ‘the Google thing’, but nothing there was really of much use, though I did find out a little about Soviet Army infrared low light lens technology from 1981 suggesting I’d used the wrong keywords.

Because some of this DCC thing is about getting to know our readers a little better, as well as hopefully having a little more insight as to why I don’t like running trains, what better than ask one of these fine souls who for some reason want to ‘like’ my smoke and mirrors approach to model railways? Some time ago I set up a Facebook page to share my modelling activities and to see other model maker’s work, so Thursday evening posted words to the effect of ‘help I haven’t a clue’. Within a few minutes I was in possession of just the numbers required to punch in to get the loco horn to “mee-marr” and the sound of that Sulzer chortle so familiar of this class. Marvelous - thank you!

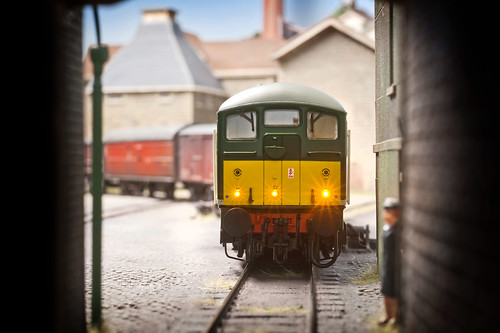
As a photographer it might be thought that there’s little advantage of DCC, but of course it allows loco lights to be lit without the loco moving as the above photo demonstrates. In the past I’d have slowly increased the power until the lights glowed, a fine balance to which anyone will know who runs DC is just as the loco starts to move. Gone are blurred locos which moved during the exposure or some obstacle just out of frame to stop the loco moving.

As for the sound, I wish I’d had it years ago when we shared walls with that family from hell, I could have blocked out their trashy 4am music, or tooted the loco horn several times just as I thought they’d finally nodded off at 8am. Moving on and leaving evil thoughts well behind, I wonder what a SDJR 7F would sound like with a sound chip?

Monday 18 June 2012

Combwich - 30 years ago!

8104_stogursey_003_01 by nevardmedia
8104_stogursey_003_01, a photo by nevardmedia on Flickr.
Combwich is a lot older than most people think, the baseboards and track dating back to 1980. It was originally called Churchstanton, then Stogursey and finally the present Combwich when I rebuilt it in 2001-present.

The layout is still very active, in fact it's better now than it's ever been:

http://www.flickr.com/photos/nevardmedia/sets/72157630183211760/with/7397034112/

Most of the stock seen here is still in regular use too over 30 years on. The signal box has moved 3 times, and some will spot the change of roof too!

The track plan showing things are they are now, hopefully it will help place things.
Seeing these pics, which are neg scans is like going down memory lane, especially because most of them were never printed. On a couple of them I have been able to digitally remove my teenage bedroom walls which were in the background, that's something I could only have dreamed of at the time!

Sunday 17 June 2012

5 Years On

43216 shunts a grain wagon into the siding at Catcott Burtle. There were no grain facilites at the halt, so the wagon probably has a hot box or some other failure.

Trying out the culvert for size in December 2007
When backing up files yesterday I picked out the photo of the culvert being tried out for size on the layout back in December 2007, it reminding me of many of the lightweight materials used for the scenic base with much of the cardboard here being from a huge flatscreen TV at the workplace. I remember at the time being far impressed by the cardboard than the TV because it was unusually stout, strong and light - the cardboard that is!

Lightweight materials extend beyond the scenic base, I also used corrugated card and foamboard in addition of the more usual ply and stripwood for the main carcase, all of which has resulted in a very light layout indeed! And whilst I wouldn't recommend such an approach for a large club layout that gets thrown about, stood on, leant on and packed away every Tuesday night at 10pm in a huge rush, it's perfect for a personal lightweight portable layout which will be treated with reasonable of care. For key areas like the outer shell, backscene and ends plywood has still been used because it's far better at taking impacts. 5 years on, and the layout still looks fresh, both the outside and inside and I don't break by back popping it in and out of the car or packing it up at home or on the road after playing trains.

I think this confirms that foamboard is ok for a layout which is treated carefully and doesn't get exposed to excessive temperatures or moisture, but if it's to be used for anything bigger than a tea tray it must be mixed with more traditional materials. But now for the crunch; would I use such for a layout the size of Catcott again (5 foot scenic)? Probably not, if only for the fact that I occasionally catch one of the foam board cross members underneath from time to time and invariably need to replace them.


.

Saturday 16 June 2012

Time machine?

Click the above photo to enlarge. © Chris Nevard
Here we are back at Combwich looking south into the midday sun, it looking like a windy day judging by those clouds. A little flare from the sun has been captured unfortunately across the smokebox door of 44417, the result of not using a lens hood.

The loco has just arrived with the morning goods from Evercreech Junction, but because it's a couple of hours until the next passenger train and the shunter is having lunch, the engine will probably be taken along to the shed for a pit stop before shunting its bounty out of the platform road into the goods yard.

Scenes like this were once every day 50 or so years ago, and era when life was probably alot slower and simpler than it is today, or so my parents tell me who are from those times. I'm sure that there are few who wouldn't jump into a time machine for a few hours or even days to sample this little slice of lost Britain. But I wonder how many of us under the age of 50 would be able to cope with pre decimal currency when the landlord asked you for one shilling and thrupence and the local shop keeper 9d for a Mars Bar? Personally I'd put on a strange accent and act foreign to get around this issue. Clever people would simply take a pensioner with them or swat up before hand of course!

Finescale modellers will I hope notice my nod to the Model Railway Journal with the typeface used here - I think quite suitable for this post.

Friday 15 June 2012

Muddy Waters! aka PVA water, the Allan Downes’ way....

I'm always being asked about some of my techniques, many of them have been in Model Rail magazine, the frequently copied original home of Workbench features. So here goes an old one for free - PVA water!

Many of my layouts have a water feature of some type, I'm not sure why, but possibly living near the murky Solent for much of my life has had a bearing.

Muddy waters lap the wharf at Cement Quay - click to enlarge!
Over the years I've seen many layouts, many of which simply use deep layers of varnish to represent water; the problem is that varnish especially when thick looks more like bitter ale than muddy tidal water which is normally full of silt and all sorts of other horrors. The only water I've ever seen in real life that's clear is a mountain stream, out of the tap and the clear waters of the Mediterranean.

For muddy water this doesn’t really work, as well as taking years to dry, stinking the house out and inevitably attracting a layer of dust and cat fur before it sets, and of course it looks a reddish brown colour like that beer just mentioned. I like beer, but tend to prefer it in a pint glass, and ideally not for too long.

Cheers! Beer looks nothing like sea or river water does it? Unless
you've had too many of these of course!
So, how to create that murky water seen in Britain’s rivers and shore lines? For this I cannot take credit, for it’s important and gentlemanly to mention that a few years ago Allan Downs explained in one of his articles for Model Rail of a happy accident when he poured PVA into a ‘to be’ river. In frustration he left it overnight with a view of sorting it out at a later stage. The following day he noticed that it had dried clear, had texture and a soft shine, Bingo! Happy indeed! This is why it's as importamt to make mistakes as to achieve success sometimes.

I’ve since used Allan’s happy accident on all of my layouts with watery bits, and you’ll be pleased to know that it’s as easy as falling off a log into real water.

Firstly prepare your area to be watered so it’s nice and smooth, joins will show through, so a scrim of plaster or some kind of filler works a treat. Then decide what colour the water should be, which in the UK is mostly a grey/brown colour, maybe with a touch of green especially if an inland waterway like a canal. Never use BLUE, that’s just something seen on postcards, children’s books or that Mediterranean holiday. In the UK we only see ‘blue’ water when the sky is blue and you’re looking out to sea. Greys, browns and greens are far better, but always choose muted tones. Any old paint will do, but it’s probably best to use one which dries waterproof to avoid the paint lifting off at the next stage. 
PVA application, be careful to avoid bubbles - click to enlarge!
Next choose your PVA, any brand will do, but waterproof PVA tends to dry clearer and less milky. With a 1 inch brush, carefully dollop on the glue whilst creating a slight texture, but don’t be too aggressive because that could produce small air bubbles and we don’t want those! Try not to use too much glue, if too thick and can set milky. Repeat once set and many times as you like, though as a rule of thumb 3 or 4 coats is enough.
30 mins of so after the PVA application, note that
it's trying clear - click to enlarge!
You might like to add the effect of water lilies or weed, quite a neat idea is to do this with a small brush and some green paint, then when dry apply more PVA over the top to encapsulate them. If for some reason you make a mess, don’t worry, just paint your base colour on again and start over. As always look at the real thing to copy, do not rely on imagination.
Paint is captured between layers of PVA to suggest
lillies and weed - click to enlarge!
Finally if you want a little more shine, Andy York to take it one stage further recommended  a very light coat of gloss varnish will give a little more twinkle, and keeping it thin will ensure it dries nice and quickly before the dust or cat settles on it.

So there you go, water the Allan Downes’ way! Thanks Allan!

Thursday 14 June 2012

Eclipse Peat (Catcott)

nevard_120614_catcott_DSC_5845 by nevardmedia
nevard_120614_catcott_DSC_5845, a photo by nevardmedia on Flickr.

I have typed a 'Billy Bullshit' page for ages, so here goes a snippett of parallel universe 'faction'.......
Click on the photo above if you think it's pretty and want to see a bigger one!

In 1966 Eclipse Peat (Catcott) upgraded its loading facility with the ability to handle the loose product as well as bagged. In August 1969, diesel hydraulic No. D6313 is captured propelling wagons under the loading hopper. On loading days, the tractor seen in the shot, endlessly pottered to and fro with loaded trailers of peat from the works seen just behind the loco.

Windy days, not that uncommon due to the proximity with the nearby Bristol Channel, would often create a peat storm, so loading frequently couldn't take place under such conditions, this making it unsuitable for rail transport with its rigid time table. In 1971 the rail transfer facility was withdrawn in favour of more flexible road haulage. The hopper here can still be seen; lorries now reversing under collect their load instead of railway wagons. Nowadays without the railway in the way, the hopper is fed by a 1500 yard continuous conveyor from the peat moor.

The old SDJR 'Branch' which shut as a through line in March 1966, remained open as far as Catcott and was worked as a long siding from Highbridge. The lack of run-around facilities meant that loaded trains were propelled backwards as far as the creamery siding at Bason Bridge, where the loco then ran around its train to travel further afield.

When rail transport from Catcott ceased in 1971, the railway was lifted back to Bason Bridge, which in turn shut in October 1972. One of the reasons for closure of the final section was the building of the M5 motorway which breached the line just east of the former Highbridge Locomotive Works.

This shot is totally un-manipulated.


Model Rail 171, July 2012

Who says that 13 is unlucky? Not if you're a Model Rail reader, because here we are just 4 weeks on again and another glorious issue is hitting the shelves as from Thursday 14 June! Of course subscribers will have already started to hear their copy falling onto the doormat or the chewing sound of the dog's jaws. 

The cover shows off Sheep Pasture, a really classy bit of P4 modelling depicting a part of the Cromford & Hight Peak route, it even has a working incline to add to what is visually and operationally a fascinating and beautifully executed model railway.

Of course the magazine has far more than that, as always Model Rail is your first stop for News and Reviews, we know you can get all that on intenet forums from self confessed frothy experts, but here in Model Rail we give you the real story of the good, the great and the wonderful, but won't be scared to say if it's a lemon either. And the best bit is that you want have to trawl through 169 pages of forum shaving foam to find it. And when you're funished with it, you can recycle it or line the cat litter tray with it. And if you're missing the froth, you get all this for the price of a foamy pint, well in Surrey anyway!
Enough twaddle from me (you're not paying for this bit), here's a run down of what's coming up for a mere snip at £3.60:
  • News - lots of it!
  • Reviews - without the froth!
  • Layout: Sheep Pasture (see above).
  • Layout: Mini-MSW (Woodhead inspired 2mm f/s).
  • Layout: Waun-gron Park (warts and all Cardiff burbs in OO).
  • Masterplan: Manx Marvels, 3 Isle of Man layout ideas penned and illustrated by the highly imaginative Paul Lunn.
  • Boxed Off, George Dent looks at the world of containerised traffic and how to model it.
  • USA/Sentinel offers.
  • George's Modelling Diary.
  • Q&A!
  • Show & Tell.
  • Workbench (the original one that others try to follow): Shape etched parts.
  • Workbench: Improve your DRS Mk2s.
  • Workbench: Polbrock Part 2 (that's me!).
  • Workbench: Make your own boilers.
  • Workbench: Use weathering dyes.
  • Workbench: Plan and build the perfect storage yard - featuring Gilbert Barnatt's Peterborough North.
  • Workbench: Find a home for your layout. 
Subscribe to Model Rail http://www.model-rail.co.uk/

Wednesday 13 June 2012

Cats, dustbin liners, 1959 and all that.....

Templecombe's 43216 is captured pottering about the sidings at Catcott Burtle on a bright but blustery day in magnificent summer of 1959.  Click on the photo to get a bigger view.

'59 was very similar to the summer of 2006, with hot temperatures and wall to wall sunshine running well into the autumn. This is probably one of the reasons why there are so many colour photographs from that year, colour films like Kodachrome 1 from that era being generally very slow and totally unsuitable for photography of moving trains unless the sun was out. Cameras in the 1950's compared to today where very expensive, especially if you wanted something with a lens faster than f2.8 which would have been needed to get a high enough shutter speed to stop a fast moving train on the mainline, even with the sun out much of the time.

Catcott has been wrapped up since last autumn in a cat proof cocoon of black dustbin liners, mostly to stop Saffy our British Short Har from chewing the tops off signal posts. This she has done this twice, I'm not really sure of the attraction of etched brass and white metal, it's not as if she's teething and the vet gave her a clean bill of health just the other day at great expense. Why is it that cats always go for the bit that cost the most in time and skills?

Cats aside, keeping the layout wrapped up has also kept it nice and fresh, dust being one of the main things that make a layout look tired, that and direct sunlight. Some think that dust makes a layout more realistic, the problem is that good lighting and a camera show it for what it is, 12 inch to the foot fluff and dead skin, mostly the latter I hasten to add! Tip: 'economy' black dustbin liners, split down either side make great lightweight layout covers that won't damage what's underneath.

Since doing up the Bachmann Midland 3F I haven't had a chance to show it off on my rose-tinted portrayal of 'The Branch' (the home of the real engine for many years), so this was one of the reasons to get the layout out, as well as trying out a new 35mm f2 Nikkor which focuses extraordinarily close for such a lens, the result being the above. It will make a good partner to my 55mm Micro-Nikkor.

Thursday 7 June 2012

Tarted up Chopper!

nevard_120606_CQx_DSC_5456 by nevardmedia
nevard_120606_CQx_DSC_5456, a photo by nevardmedia on Flickr.
A rather clean 20168 in Lafarge livery slowly pulls a train under a centrifugal hopper on Cement Quay.

In spotterdom these locos are often referred to as 'Choppers', this is gather is to do with the fact that they sound like a helicopter rather than looking like a male appendage. I might be wrong of course, but I'm sure I'll find out soon enough from chopper fanciers and class 20 aficionados.

Pete Harvey, yes that's him of Pete Harvey Etchings did this conversion a few years ago using home-grown transfters and the addition of a rather flash paint job. The real 20168 resides at the Hope Cement works in deepest Derbyshire, and is used to transfer wagons to and from the terminal to the exchange sidings (known as Earles Sidings). And in fact when I was last in the area I was lucky enough to capture this brightly coloured little chappy as it trundled over the concrete viadact next to the Cheshire Cheese Inn - here is the shot by the way. And yes the pub is worth a visit too, expecially if you like beer and trains, though the staff might throw you out if you ask whether they've seen any brightly coloured choppers recently.

I agree that 20168 lacks a little work-a-day patina, a little grubbyness to its nether regions at least wouldn't go amiss, but light weathering can be a tricky one, and whilst I've weathered dozens of locos during my life, this is one that I haven't plucked up courage to do yet. The reason for this is most likely down to the fact that I cannot simply strip it all off if I make a mistake and start again. I will in time though, but there again it's quite nice to have a pristine loco in my collection of grubby old heaps.

And no, it's not for sale!

If you're a modern image modeller, be sure to check out Pete's website  at http://www.phd-design-etchings.co.uk/ to see all the goodies he etches for post steam modellers.

Tuesday 5 June 2012

P-A-N-O-R-A-M-A

350124 is captured flying through fields of rapeseed and an old platlayer's hut near Church Brampton, on a sunny Tuesday 22 May 2012. Bigger version here.

Modern unit trains aren't always the most inspriring things to photograph, so whilst waiting for the more interesting freight workings and because the weather and colours were on this particular day and location were so magnificent, I decided to have a go at shooting a panorama - the result being the above.

I shot the train first, then as soon as it passed shot the remaining exposures that will make up the final panorama - the exposure above being a compilation of just 3 exposures using a moderate wide angle lens. The reason for speed is importatant, especially if there are lots of clouds on a windy day, because if they move too quickly between exposures you might end up with odd cloud effects in the sky as the software battles with registry.

As well as the above photo, the whole day was very rewarding, with a good selection of freights, wall to wall sunshine and even a few diverted passenger trains via the Northampton Loop line. The results can be seen here:
http://www.flickr.com/photos/nevardmedia/sets/72157629855144418/with/7255433590/

A similar technique can be used to create a backscene for a model railway, especially if you don't want your layout to share the same backscene as everyone else or if you want something just the right size for your layout without repeating scenes because the supplied one isn't long enough. So to address this, coming soon in Model Rail mag I have created an in-depth highly illustrated feature on just to to do this, along with ideas of how to get it onto paper without joins.

Monday 4 June 2012

Industrial Chic?

6 weeks of so ago I mentioned the need to get on with unfinished projects, with a new siding and aggregate loading facilities being my prime focus of my current personal projects.

I like to adapt existing kits when possible, especially for fiddly industrial stuff. For the loading thingy here, a Ratio coaling tower (547) has been made up over a couple of afternoons, and obviously it needs a nice paint-job and dose of patina to make it come to life. This is an older style of kit, older in that it uses a huge number of parts, which could have been moulded in single tougher parts. For this reason I don't think it's a kit for the total beginner, some of the parts being more akin to a scratchbuilder's aid due to lack of locating lugs and markings esecially when it come to the laddering and handrails. Still, I hope you agree even in its unfinished state it mas built up into an interesting and maybe even exciting structure.

Whilst the kit is structurely complete when it come to how the manufacturer intended, I'll be adding extra bits to make it suit the location better as a means of loading aggregate and minerals into open wagons. One of the additional features will be an aerial conveyor much like the one just seen in the distance, and if I'm clever I might even try to devise of a way of making it possible to actually load wagons with a loose load hidden which runs through from behind the backscene. But there again I might not because I'm not one for mechanical ingenuity!

Sunday 3 June 2012

Brugge Break

120601_brugge_DSC_5250 by nevardmedia
120601_brugge_DSC_5250, a photo by nevardmedia on Flickr.

A well deserved break has been needed for quite some time, so at the very last moment we hit Laterooms.com, Eurotunnel and booked a couple of days in Bruges, Begium.

Bruges, or Brugge as the locals call it, is a beautiful moat surrounded medieval town full of gorgeous cobbled streets and buildings which haven't been swept away by 1960's developers, of if they have, they've been built to blend in. Europeans, apart from maybe the French who love concrete even more that us Brits are frequently much better in this respect. If I was to compare in to somewhere in the UK that comparison would fall to Bath or York.

Bruges isn't somewhere if you're after the high life partying or going to Disneyworld, it's a little more grown up and genteel than that, its 'entertainment' is the architecture and many cafes, all of which sell a huge number of interesting beers. In fact their beers, being of the top fermented variety have far more in common with an English ale that any German lager.

So, rather than show you dozens of photos of buildings which will be there long after I've gone, and anyway a Google image search will pull of billions of those, I used the camera to capture some of the drinks we enjoyed. And if I had to choose a bar for the desert island, that honour would have to be Brugs Biertje which has the biggest beer menu I've ever seen!


And now to the beer photos here!